Well, since all of the easy stuff has already been taken care of, time for some real fun to begin soon - installing the front timing cover and oil pan on my 289 motor build. I know there are more than a few threads already on this of one sort or another, and I've read a bunch of them. But despite that, here is a thread to document that and maybe pull everything regarding this all together here in one location. Pardon this 1st long winded start on this, but I wanted to cover all the bases right off the bat. As always, feel free to comment and question whatever. Like the rest of it, this will be my first attempt at doing this, probably already have a few things wrong or could do better or flat out just mess up.
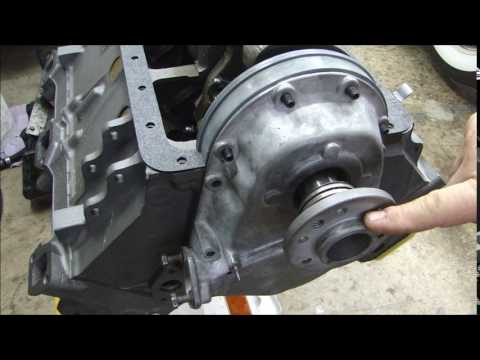
As a reminder, this is where I started with this whole rebuild myself after I got the motor back from the last shop a couple months ago back in July.


The exceedingly poor job they did with all of this is what prompted me to question the whole entire build and then subsequently end up taking the entire motor apart and checking everything and now putting it back together properly. So now I am back to this point again where it started and want to do it right this time, and on a motor that has all been checked out now.
To begin with on this particular topic, most of the issues people have seem to be about these 4 main issues:
1) the timing cover crank hub seal, convert from factory felt to a modern neoprene seal or not and how to do it if so
2) the thickness of the oil pan cork side gaskets and the fitment of the front filler block - newer cork composite gaskets maybe being slightly thicker than original
3) the fitment of the front and rear cork strips for the curvature and how to deal with that
4) The fitment of the front and rear cork strips for the length and if to trim them a little or not
After reading up on all of this, I know this will be a bit of a PIA part of the whole job. And it should all kind of be done at the same continuous time so it all fits. seals and cures up in one shot. So I'm trying to get all my ducks in order before I jump into this. Here is my pile of parts ready to go so far.

I think I have it all down and ready, except I'm still on the fence as to whether it is a good idea or not to trim the length on the front and rear cork strips some to fit better.

I have to admit, test fitting the rear one to start does look to me that it is a bit excessively long and I'm having a hard time imagining it really needs to be compressed that much to work properly, or even convinced that it can be. Or if can, will it take wrenching down on the pan bolts excessively hard to accomplish it? Hence why the flanges on the oil pans always seem to be overly torqued and the side gaskets overly compressed and squeezed out to failure like this motor had when I got it. If those front and rear strips only need to be compressed a normal reasonable amount, then maybe it is easier to not be tempted to crank so hard on the pan bolts, or need to.
Anyway, gathering my parts pile and mental fortitude to tackle this next coming up. Wish me luck. From what I've read, seems like I might need it.
Jim Maxey and Fred Fritz's videos on it:
1. Timing cover seal conversion with cameo with Ted Harbit
https://www.facebook.com/SDCMichianaChapter/videos/2599085933693587
2. Timing cover install
https://www.facebook.com/SDCMichianaChapter/videos/822460555241345
3. Oil pan install

Pete's Garage video
1. Timing cover install
2. Oil pan install
Some things of note:
1. I got the proper later V8 5-quart oil pan to replace the early 6-quart one I had before that had the clearance problem with the #1 rod palnut. Thank you Phil Harris at Fairborn Studebaker for that.
2. I had Phil send it directly to Kevin Orloff at Studebaker Acres to modify it to R1/R2 type. Not so much for HP and hi performance, but because I thought having the extra PCV that those have might be better to help prevent or at least minimize the chances of oil leaks. Thought is that with less or even negative pressure on the crankcase, the less pressure to push oil out through leaks. I'm not sure if this will give me just less pressure or actual negative pressure for that. But anyway, that is the hope on that. I know I could have just done the PCV part more simply and directly than converting the whole pan to R2/R3 specs with the oil baffles and custom tube, etc. But I'm trying to keep this motor looking as period and Studebaker factory appropriate as is reasonably possible.
3. My timing cover seal was converted to the neoprene seal most recently by the previous shop. It was a major PIA dealing with them on it trying to tell them how to do it and do it right, despite just giving them multiple sources of on-line info to follow and the specific parts to get. They thought they knew better of course. I told them to not reinvent the wheel, just do what others have done and been successful with. In the end, they finally relented and just did what I told them to do. So the cover currently has a new seal in it, supposedly lined up from the previous poor assembly and "glued" in place now with sealant. Seems good, but I may have to pull that back out and redo it again so that it cures in optimal place to align exactly to the hub as it goes back together.
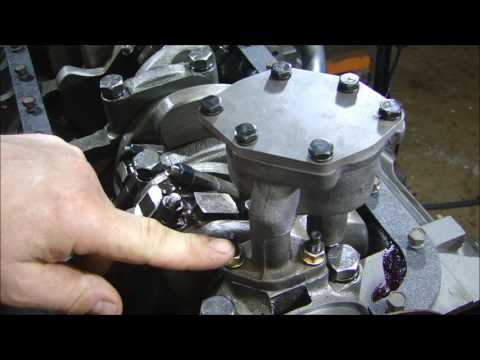
4. My front filler block had been installed improperly by the previous shop with a large gap between the timing cover and block and then overly torqued to try to close the gap, which they didn't even manage to do. See photo above. So the filler block was bent up and the hole threads were stripped out. So I had to straighten the block back out with a little hammer and sandpaper work. And I helicoiled the holes.
5. I banged out the bolt holes on the oil pan to straighten those out better. And got some side rail reinforcement strips from Phil Harris to help prevent that again, keep the flange flatter when gets torques down.
6. I got the Fel-Pro oil pan gasket set from Stephen Allen's, thanks Matt! I can't recall on the timing cover gasket, but think them as well previously.
7. I will make some alignment studs from some bolts to help align things and keep the gaskets in place as I put it together
8. Planning to use the Right Stuff as gasket sealer.
9. Cork front and rear gasket strips are currently curled up to help pre bend them into shape so have to fight them a bit less. They seem like fresh pliable cork, so no problems with being old dried out and cracking, so far anyway. Maybe I will heat them up a bit in the oven, or maybe with a clothes steamer, to help encourage them to stay curved if needed.
One of my main goals for this whole motor project was to have a motor that wasn't leaking oil all over the place, unlike the 259 that was in my truck before. So I definitely want to take my time and get this part of it right to at least minimize any future leaking as much as possible.
That is it for now. Will probably try to tackle this project this week once I feel am ready, have a good block of dedicated time to jump into it for a while. Stay tuned.
As a reminder, this is where I started with this whole rebuild myself after I got the motor back from the last shop a couple months ago back in July.
The exceedingly poor job they did with all of this is what prompted me to question the whole entire build and then subsequently end up taking the entire motor apart and checking everything and now putting it back together properly. So now I am back to this point again where it started and want to do it right this time, and on a motor that has all been checked out now.
To begin with on this particular topic, most of the issues people have seem to be about these 4 main issues:
1) the timing cover crank hub seal, convert from factory felt to a modern neoprene seal or not and how to do it if so
2) the thickness of the oil pan cork side gaskets and the fitment of the front filler block - newer cork composite gaskets maybe being slightly thicker than original
3) the fitment of the front and rear cork strips for the curvature and how to deal with that
4) The fitment of the front and rear cork strips for the length and if to trim them a little or not
After reading up on all of this, I know this will be a bit of a PIA part of the whole job. And it should all kind of be done at the same continuous time so it all fits. seals and cures up in one shot. So I'm trying to get all my ducks in order before I jump into this. Here is my pile of parts ready to go so far.
I think I have it all down and ready, except I'm still on the fence as to whether it is a good idea or not to trim the length on the front and rear cork strips some to fit better.
I have to admit, test fitting the rear one to start does look to me that it is a bit excessively long and I'm having a hard time imagining it really needs to be compressed that much to work properly, or even convinced that it can be. Or if can, will it take wrenching down on the pan bolts excessively hard to accomplish it? Hence why the flanges on the oil pans always seem to be overly torqued and the side gaskets overly compressed and squeezed out to failure like this motor had when I got it. If those front and rear strips only need to be compressed a normal reasonable amount, then maybe it is easier to not be tempted to crank so hard on the pan bolts, or need to.
Anyway, gathering my parts pile and mental fortitude to tackle this next coming up. Wish me luck. From what I've read, seems like I might need it.
Jim Maxey and Fred Fritz's videos on it:
1. Timing cover seal conversion with cameo with Ted Harbit
https://www.facebook.com/SDCMichianaChapter/videos/2599085933693587
2. Timing cover install
https://www.facebook.com/SDCMichianaChapter/videos/822460555241345
3. Oil pan install
Pete's Garage video
1. Timing cover install
2. Oil pan install
Some things of note:
1. I got the proper later V8 5-quart oil pan to replace the early 6-quart one I had before that had the clearance problem with the #1 rod palnut. Thank you Phil Harris at Fairborn Studebaker for that.
2. I had Phil send it directly to Kevin Orloff at Studebaker Acres to modify it to R1/R2 type. Not so much for HP and hi performance, but because I thought having the extra PCV that those have might be better to help prevent or at least minimize the chances of oil leaks. Thought is that with less or even negative pressure on the crankcase, the less pressure to push oil out through leaks. I'm not sure if this will give me just less pressure or actual negative pressure for that. But anyway, that is the hope on that. I know I could have just done the PCV part more simply and directly than converting the whole pan to R2/R3 specs with the oil baffles and custom tube, etc. But I'm trying to keep this motor looking as period and Studebaker factory appropriate as is reasonably possible.
3. My timing cover seal was converted to the neoprene seal most recently by the previous shop. It was a major PIA dealing with them on it trying to tell them how to do it and do it right, despite just giving them multiple sources of on-line info to follow and the specific parts to get. They thought they knew better of course. I told them to not reinvent the wheel, just do what others have done and been successful with. In the end, they finally relented and just did what I told them to do. So the cover currently has a new seal in it, supposedly lined up from the previous poor assembly and "glued" in place now with sealant. Seems good, but I may have to pull that back out and redo it again so that it cures in optimal place to align exactly to the hub as it goes back together.
4. My front filler block had been installed improperly by the previous shop with a large gap between the timing cover and block and then overly torqued to try to close the gap, which they didn't even manage to do. See photo above. So the filler block was bent up and the hole threads were stripped out. So I had to straighten the block back out with a little hammer and sandpaper work. And I helicoiled the holes.
5. I banged out the bolt holes on the oil pan to straighten those out better. And got some side rail reinforcement strips from Phil Harris to help prevent that again, keep the flange flatter when gets torques down.
6. I got the Fel-Pro oil pan gasket set from Stephen Allen's, thanks Matt! I can't recall on the timing cover gasket, but think them as well previously.
7. I will make some alignment studs from some bolts to help align things and keep the gaskets in place as I put it together
8. Planning to use the Right Stuff as gasket sealer.
9. Cork front and rear gasket strips are currently curled up to help pre bend them into shape so have to fight them a bit less. They seem like fresh pliable cork, so no problems with being old dried out and cracking, so far anyway. Maybe I will heat them up a bit in the oven, or maybe with a clothes steamer, to help encourage them to stay curved if needed.
One of my main goals for this whole motor project was to have a motor that wasn't leaking oil all over the place, unlike the 259 that was in my truck before. So I definitely want to take my time and get this part of it right to at least minimize any future leaking as much as possible.
That is it for now. Will probably try to tackle this project this week once I feel am ready, have a good block of dedicated time to jump into it for a while. Stay tuned.

Comment