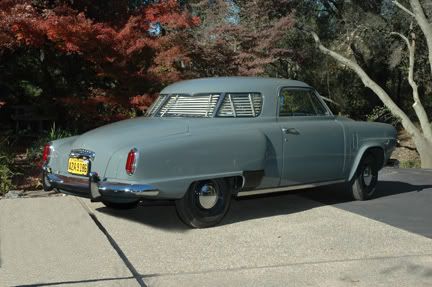
Does anyone know of an easy way to install the four piece rear windows in a 1951 starlight coupe. After 8 hours got one rear and one side in.
-
-
Are you following the instructions in the shop manual? Can't get much easier than that.Brad Johnson,
SDC since 1975, ASC since 1990
Pine Grove Mills, Pa.
'33 Rockne 10, '51 Commander Starlight. '53 Commander Starlight
'56 Sky Hawk in process -
I had a very experienced glass guy install mine, and it was really a battle. The problem is that the windows curve around, so that the gap at each opening is wider at the outside than at the inside, i.e., they taper the wrong way for installing from the inside. What the idiots at Studebaker were thinking is beyond me, but these windows obviously should have been designed to install from the outside. However, they are what they are and it is not going to be easy.
If you are not already using one, I suggest using a suction grip so that you can put a lot of force forward or back on the glass. My guy used a lot of soapy water for lubrication. Took him and his helper about one hour to install the four pieces.
He told me that it is common for the aftermarket rubber seals to be molded to the wrong shape and there is virtually nothing you can do to make them fit as well as the originals. The seals I got from SI are a poor fit. I will eventually make some metal corner pieces to hold down the seals- this is not easy because there is nothing to screw them to.
Trying to build a 48 Studebaker for the 21st century.
See more of my projects at stilettoman.infoComment
-
This is way more information than the original thread asked for, but I'll submit it anyway. My wife wrote this in 1987 after we installed the windows in our Starlight. The one piece gaskets were not available at that time. So here goes:
_________________
After “experiencing” the installation of the four back windows to our 1950 Champion, perhaps a few tips we learned will be of interest to other Champion owners in the restoration process. Unfortunately, even if the windows and molding are in good condition, they must be removed if a new headliner is to be installed in the original manner. The car was taken to a local glass shop, but installation procedures have changed so much in the past 35 years that basically a few tips were given and we were sent on our way. The following is offered:
1. Make sure you have a quality relationship with the other person who will be assisting you. This is definitely a two-person job and a stressful job.
2. Make sure the rubber gasket has the correct dimensions and enough is purchased at one time. Dealers selling the gaskets also handle other parts and may not have the required detailed knowledge to assure the correct material is supplied. This may not be discovered until the installation is to take place. There are rubber vertical center bars offered. This did not apply at all to our car. We just trimmed the edge material and used it for the window dividers. When more edge material was ordered, the center bars returned, it did not match the original material supplied. (Year 2003 note: This is less of an issue now as complete molding kits are now available, not just pieces)
3. When applying the rubber gasket to the curved sections of the back windows, be sure to stretch the gasket tightly.
4. Be sure to miter the inside edges of the rubber gasket at the corners before inserting a “pull string”.
5. We discovered the best “pull string” was actually a rubber gasket for a screen door.
6. Do NOT use a screw driver on the rubber molding. Get a glazier’s “bone” which looks very much like a Tupperware orange peeler. This tool is indispensable!!!
7. Place a thin beading of liquid soap on the outside edge of rubber gasket before trying to install the window in the car from the inside. File any rough edges from the window opening. The “pull string” is placed around the window in the gasket “trough”, that will be replaced by the car body at the end of the installation. With one person inside holding the glass up to the window opening, the other, on the outside, pulls the string, allowing the gasket to slip over the metal body edge.
8. Do not try to get the window gasket up to the edge of the car frame. If a small space exists, up to ¼”, it is actually easier to tug the “pull strings” and lap the gasket over the frame edge.
9. The process for each window took about 1 ½ hours. This is a long and delicate process.
Best wishes to all who try to install 1950 Champion Starlight back windows! They are the distinguishing feature of the car and worth the effort.
 Perry
Perry
\'50 Business Champion
\'50 Starlight Champion
\'60 Lark Convertible,
\'63 GT R1,
\'67 Triumph TR4AComment
-
I take issue with the "common knowledge" that the windows have to be removed to install a headliner in 47-52 Studebakers.
I developed a technique 30 years ago to install the headliner with the windows in place and used it on two starlight coupes. One car was eventually sold, but the other one is still in my possession and the headliner is still intact.Comment
-
When I first rebuilt my '51 the backlight rubber was only available by the foot and had to be cut and fit. When the first set of four-piece rubbers were available I got them and they fit very nicely. I was under the impression they were from William Fennessey, and suspect Valerie is still producing that product from the same molds.Originally posted by 48skyliner View PostBrad Johnson,
SDC since 1975, ASC since 1990
Pine Grove Mills, Pa.
'33 Rockne 10, '51 Commander Starlight. '53 Commander Starlight
'56 Sky Hawk in processComment
-
Bought gaskets from Studebaker International only one of the four went in. I sent the remaining three back and they replaced them with different lots of number gaskets. I was able to get one more in with a lot of work. I will remove the seats and try using more soapy water and a suction cup and see what happens for the last two.Comment
-
Have you ever read the 51 instruction manual and installed the four piece rear window? I don't think so, because they only refer to the one piece glass.Comment
-
There is no "easy way"
It`s a mission to say the least.
When I replaced mine with new SI seals the passenger side wasn`t to bad but when it came to fitting the drivers side a whole different ball game
The inner drivers one was the hardest to fit.
Ended up beating it with a rubber mallet to get it in.
Good job it was toughened glass
GeoffComment

Comment