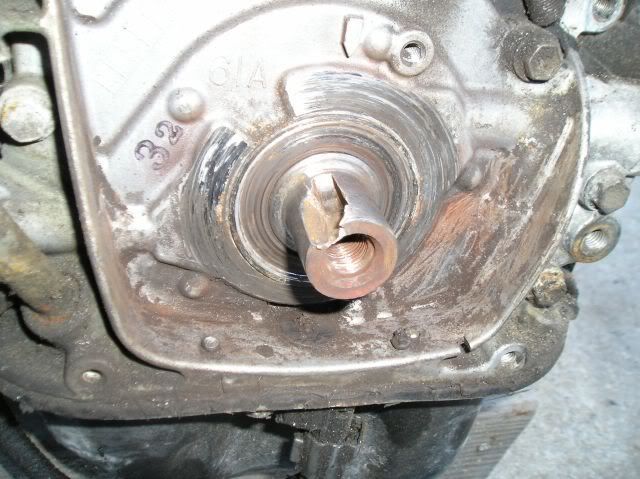
I'm getting ready to put the crankshaft pully hub back on.Are there any tricks to make it easier?I did order an installation tool from Fairborn Studebaker. Thanks, Dave
-
-
....I had been advised, and have used (I think and hope safely) an impact wrench watching for pulley alignment for depth.... -
Hopefully the crank is cold. Heat the hub to about 200. Install with tool. Be sure seal is lubed a little. Don't hesitate. Run down and then torque. Have everything ready and don't give the heat/cold time to transfer.Comment
-
Yep Goodwill for a $5 toaster oven does well. You'd think a new toaster over for the missuz and using the old one would be better, but, no.
Originally posted by Flashback View PostRon Dame
'63 ChampComment
-
Don't forget the bolts for the pulleys go through from the BACK SIDE. (unless it's an R series dampener)Bez Auto Alchemy
573-318-8948
http://bezautoalchemy.com
"Don't believe every internet quote" Abe LincolnComment
-
1. Either be sure to install the thru bolts into the back side of the hub or assemble the damper as a whole assembly onto the crank.
2. Heat as advised above (200/250 degrees) as long as you can QUICKLY start the installation, once removed from the oven, make that at least a 45 minute soak, an hour is better.
3. Key in place.
4. Some oil on the crank.
5. I would NOT use an impact wrench...just a standard ratchet.
6. MOST definatly used the hub puller/pusher.
7. Final torque.
MikeComment
-
Hi Jackb,
"watching for pulley alignment for depth....:
I think the hub needs to be seated hard against the shims etc and ultimately against the shoulder on the crank. If the pulley alignment is off I'd address that separately.Comment
-
Also, it 's good to loosen the timing cover bolts so the cover centers on the hub and doesn't impinge on one side. Tighten again after the hub is "all in"64 GT Hawk (K7)
1970 Avanti (R3)Comment
-
HTIH (Hope The Info Helps)
Jeff
Get your facts first, and then you can distort them as much as you please. Mark Twain


Note: SDC# 070190 (and earlier...)Comment
-
Dan: I was talking about replacing a matched crank, damper, and 1 pulley. No shim removed...... assuming all was well before removal (yes), I'd say easily impacting it home until pulleys align brings things back to pre-removal alignment ? Any trouble here ? Asking ?Comment
-
Pullies are going to be aligned when the hub goes "home"Comment
-
Hi jackb,
I consider the damper bolt to be part of a hard working structural joint, just like rod and main cap bolts and flywheel bolts. They need careful assembly and full torque to survive.
I don't think I would notice if the pulleys (and hub) were 0.003 inch too far forward, which is what could happen if the hub was not FIRMLY seated against the sandwich of timing gear, main bearing thrust plate and end play shims, and crankshaft shoulder.
The factory torque spec for the damper "retaining screw" is 140 ft-lbs. That much torque creates more than 10,000 lbs of clamping force. Some is needed to overcome the damper hub press fit, but there are 1000s of lbs left over to axially clamp the timing gear and damper hub which are constantly and actively trying to wiggle at high frequency and will fret and wear the mounting surfaces unless held immoveable.
Some modern engines have slip-fit gears and hubs, so rely exclusively on the axial clamping from BIG torque.
This is what happens when the crank damper bolt torque is insufficient.
My 259 received a long snout crank long before I got the car, but was installed without matching hardware to clamp the hub against the shims, timing gear, and thrust plate. The crank had what looked like 1/8 inch endplay. When proper hardware ( hub, etc) was added the endplay was correct. Who knows if the timing gear and thrust plate were //ever// seated against the crank, but even if they were, they had crept forward because the hub was not holding them tightly in position.
I can only imagine (nightmare) what was serving to limit rearward motion when the engine was running with that much endplay. The rod big ends have only about 0.015" side clearance, so if the rod-to-piston clearance is less than 1/8 inch at some point the rod wrist pin ends would have bearing against the piston bosses . Not a job the rod or piston would likely handle well.Last edited by Dan Timberlake; 01-19-2014, 08:15 AM.Comment
-
thanks...so what's the preferred way to keep the crank from turning so as to obtain the correct torque ?Comment
-
I got it installed yesterday and had no problems at all.Thanks for all the tips. DaveComment
Comment