I'm continuing on my quest to have the 74 Avanti running prior to paint, mainly to save the painted surfaces from all the exposure to damage as I get the under hood jobs done.
I started with an Generic SBC Aluminum radiator from Speedway (19" X 26") on sale at $89. Took it to my local fab shop, Ackermann Brothers as a plug, and they bent up top and bottom mounts, then TIGed them to the radiator $80. I'll save all the install which is straight forward and just show the radiator installed.

You can see that I've converted to a serpentine system (89-91 Camaro TPI) because I had most of the parts on hand and I like the system because it will allow an upgrade to A/C easily and the tensioned single belt is a plus. The downside of a serpentine system is it adds length to the front of the engine and makes an engine powered fan a very difficult install.
So after much internet searching I decided to use A Flex-A-Lite Syclone 398 electric fan. Why?? The internet has a lot of data on them cooling engines up to big blocks and it's also reported to be fairly quiet. I looked at a Lincoln Mk VIII unit but was turned off by the huge amount of power they consume and the controller. They remain an option but I like this one to start with.
I would never run an electric without a shroud so lets go fabricate and install the fan and shroud.
I decided to build the shroud as I couldn't find an aftermarket unit that I like the fit of the shroud on my radiator.
I started with two sheets of 14ga stainless steel (12" X 24") from Ebay ($50) you just can't get those prices around here on SS and Aluminum.

I can't bend 14 ga here so I used the old method of cutting part way through the sheet with a 4 1/2" cutting wheel and then bending it by hand.
 This is how it looks in progress.
The layout with the fan outlined and the initial concept installed on the radiator.

Shroud has been removed from the radiator, the sheet Plasma Cut with my Chinee Cutter and the mounting nut-serts installed.

The fan mounted in position

The initial shroud assembly mounted in the Avanti

It's a fairly tight fit with the fan so I modified it by tapering the sides from top to bottom

That freed up some clearance so this is the entire installation as it sets.

I still need to weld all the bent edges, gring and polish the entire unit and install gaskets but this is enough to get me on to other activities. The closest clearance is about 3/4 of an inch. Not huge but it should be a lot more than necessary.
As an aside. There are posts on the radiator hoses that fit an SBC powered Avanti, Well, not when you use this radiator with a Serpentine setup. But the lower one that is suggested has the correct bends just not in the right places and it is too long. So I cut the hose into sections and made an adapter from stainless steel pipe to connect the two sections together. You can see the hose setup in the above picture.

I'm now a fuel system, a couple of brake connections, a couple of head pipes and a basic wired starting and ignition system away from getty-up. The forum will only let me post 10 shots but I just love the way the engine compartment is coming together so here it is full size.
[IMG]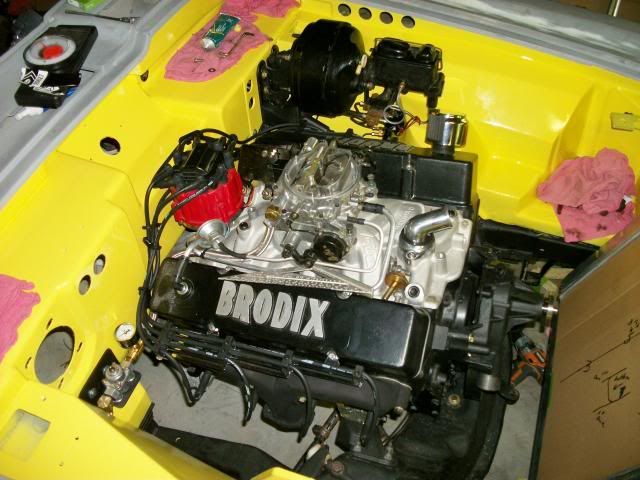 [/IMG]
PS - This is the controller I'll be using with the fan. http://www.summitracing.com/parts/der-16749
Avanti, Bob
I started with an Generic SBC Aluminum radiator from Speedway (19" X 26") on sale at $89. Took it to my local fab shop, Ackermann Brothers as a plug, and they bent up top and bottom mounts, then TIGed them to the radiator $80. I'll save all the install which is straight forward and just show the radiator installed.
You can see that I've converted to a serpentine system (89-91 Camaro TPI) because I had most of the parts on hand and I like the system because it will allow an upgrade to A/C easily and the tensioned single belt is a plus. The downside of a serpentine system is it adds length to the front of the engine and makes an engine powered fan a very difficult install.
So after much internet searching I decided to use A Flex-A-Lite Syclone 398 electric fan. Why?? The internet has a lot of data on them cooling engines up to big blocks and it's also reported to be fairly quiet. I looked at a Lincoln Mk VIII unit but was turned off by the huge amount of power they consume and the controller. They remain an option but I like this one to start with.
I would never run an electric without a shroud so lets go fabricate and install the fan and shroud.
I decided to build the shroud as I couldn't find an aftermarket unit that I like the fit of the shroud on my radiator.
I started with two sheets of 14ga stainless steel (12" X 24") from Ebay ($50) you just can't get those prices around here on SS and Aluminum.
I can't bend 14 ga here so I used the old method of cutting part way through the sheet with a 4 1/2" cutting wheel and then bending it by hand.
The layout with the fan outlined and the initial concept installed on the radiator.
Shroud has been removed from the radiator, the sheet Plasma Cut with my Chinee Cutter and the mounting nut-serts installed.
The fan mounted in position
The initial shroud assembly mounted in the Avanti
It's a fairly tight fit with the fan so I modified it by tapering the sides from top to bottom
That freed up some clearance so this is the entire installation as it sets.
I still need to weld all the bent edges, gring and polish the entire unit and install gaskets but this is enough to get me on to other activities. The closest clearance is about 3/4 of an inch. Not huge but it should be a lot more than necessary.
As an aside. There are posts on the radiator hoses that fit an SBC powered Avanti, Well, not when you use this radiator with a Serpentine setup. But the lower one that is suggested has the correct bends just not in the right places and it is too long. So I cut the hose into sections and made an adapter from stainless steel pipe to connect the two sections together. You can see the hose setup in the above picture.
I'm now a fuel system, a couple of brake connections, a couple of head pipes and a basic wired starting and ignition system away from getty-up. The forum will only let me post 10 shots but I just love the way the engine compartment is coming together so here it is full size.
[IMG]
 [/IMG]
PS - This is the controller I'll be using with the fan. http://www.summitracing.com/parts/der-16749
Avanti, Bob


Comment