Announcement

Collapse
No announcement yet.

Help! How to deal with broken(??) nut INSIDE the frame, for 57 Hawk floor support member?

Collapse
X
 
  • Filter
  • Time
  • Show
Clear All
new posts

  • Body / Glass: Help! How to deal with broken(??) nut INSIDE the frame, for 57 Hawk floor support member?

    I was just ready to start piecing back together the driver's side floor in my '57 Golden Hawk. Have the new Classic front body support in place, welding primer in place, etc.... when I discovered there is NOT a 'through hole" in the frame for the body-mount's bolt hole. When I removed it, the bolt head had snapped off immediately, and I figured the broken "other end" probably had gotten swept up with all the other garbage that keeps falling off the underside of the body everytime I whack it or grind or wirebrush.... Didn't think much about it until I started looking for a new bolt in the assortment of NOS frame bolts I bought, and started trying to find the "other hole" in the frame where it must go through.
    No hole. Actually, there IS a hole (which I thought was the one) but it doesn't line up.
    So, I went over to the passenger side (untouched yet), and very carefully removed that same bolt over there. It didn't break, and I can see lots of threads directly under the hole on the TOP of the frame. Did Stude weld a nut INSIDE the frame before putting the frame together??? Am I missing something obvious here? I don't see any way to
    A) get at that area from inside the frame to put a nut on that bolt
    B) or weld it in place if I COULD
    Plus, the batwing seems to be solid without a hole, so must have been a captured nut somehow

    Do I have to try and drill a hole through both the Batwing and the BOTTOM of the frame, go buy an extra long bolt, and tighten it up that way? Thought about trying to sneak a nut up and in with a magnet from one of those holes on the bottom of the frame farther down the channel, but I'd never get a wrench in there to hold it to tighten it.
    Suggestions??? In the photos, you can see the snapped off nut from THIS mount, and next to it the unbroken bolt from the passenger side.
    Thanks!
    Barry
    Attached Files
    Last edited by bsrosell; 12-16-2011, 12:36 PM.

  • #2
    What I do is get a Stainless steel flange nut of 3/8" coarse thread and use a step drill so that the flange sets in then weld it to the frame. Make sure that when you put a stainless bolt in, to use never seize.

    Comment


    • #3
      and they make threaded inserts that swell up and lock in place after you put them through the hole, then tighten with the appropriate bolt and a washer
      I've used them on frames to mount fender brackets etc (not Stude frames, but the process is the same)

      Like these:


      even tho that's not the brand I recall using
      Last edited by allstateguy; 12-16-2011, 01:52 PM.
      sigpic
      JohnP, driving & reviving
      60 Lark & 58 Scotsman 4dr

      Comment


      • #4
        thanks guys. That gives me another idea; assuming I can wrangle that mount out again (wasn't easy to get it IN, I didn't cut out a lot of floor...) maybe I can grind or file the shape of the nut into the hole in the frame and weld in the original (NOS) fine thread nut... Never thought about trying to do anything from the TOP side..... I already have to weld a nut on the OTHER end of the mount for the outboard bolt there, regardless, so shouldn't be a problem. There is a pad between there and the mount, anyway, so doesn't have to be perfect or perfectly flush, though DOES need to be square for bolt to be square. Now, do I have enough room between my left-over floor and the frame to weld that nut...... I guess I can always "improve" the weld later when I finally take the body off too, just need it solid enough to hold while I tighten down to position things for the floor installation and door alignment check.
        thanks again for the ideas!

        Comment


        • #5
          Alan, why do you use a stainless nut, and why 3/8 (any particular reason, vs the original fine-thread?)
          I'm new to MIG welding, would a stainless nut weld as easily to the regular steel frame channel as a standard nut would?

          Went out and looked again, I have VERY little room through my floor to weld, basically have to weld through the bolt hole, so at best could tack something in place for now, to get the body support snugged into place (hopefully the lower bolt next to it would take most of the load, all the top one has to do is snug the floor back down so I can spot-weld the new floor panel to the support member). I don't think I can do what I was planning, not enough room to 'shape" the hole in the frame to fit the hex nut, your way is probably my only option.

          Allstateguy, I checked the website link, I'm not sure I understand how that will clinch, or if I that would be any easier, besides wanting to get this done this weekend and early next week before family starts coming in for Christmas and I don't have time to get anything.... and then back to REAL (ie: paid) work. :-) Thinking I can get the flange nut at Ace Hardware, but would have to special order the clinch nut off the internet.....??
          Originally posted by Alan View Post
          What I do is get a Stainless steel flange nut of 3/8" coarse thread and use a step drill so that the flange sets in then weld it to the frame. Make sure that when you put a stainless bolt in, to use never seize.

          Comment


          • #6
            Do I have to try and drill a hole through both the Batwing and the BOTTOM of the frame, go buy an extra long bolt, and tighten it up that way?
            If the body is coming back off later so it would be easier to do it correctly, you could drill a hole through the bottom of the frame and use a long bolt or a piece of all-thread just to hold your floor in place for welding. Alternately, make a J-bolt to hook through the hole until you're done welding.

            jack vines
            Last edited by PackardV8; 12-16-2011, 03:59 PM.
            PackardV8

            Comment


            • #7
              I had a similar situation on a project a few years ago. What I ended up doing was to cut a 9/16" hole centered on the offending nut plate, then I drilled and tapped the center of a ~3/4" X1/2" piece of 1/4" steel stock to the size of the original nut plate. I then put a long bolt thru the threaded hole for a "handle" and slipped it through the 9/16" hole one side first, then dropped the other end in, centered the tapped hole and welded the plate from the top. It's difficult to describe but really easy to do if you can visualize what I'm struggling to explain......

              Comment


              • #8
                The stainless flange nuts are easy to install from the top, with a step drill. I use the TIG welding method. Which is easiest for me. As long as you use never seize your grandchildren can remove it.

                Comment


                • #9
                  Great idea Jack; that takes the urgency off doing ANYTHING now that is half-baked, and I really have almost no clearance to do any decent welding of ANYTHING there now. I already went to the hardware store and bought a J-hook of the correct size and that should hold things in place to position and tack-weld everything down. Thanks!!! (now why didn't I think of that.... :-)

                  Originally posted by PackardV8 View Post
                  If the body is coming back off later so it would be easier to do it correctly, you could drill a hole through the bottom of the frame and use a long bolt or a piece of all-thread just to hold your floor in place for welding. Alternately, make a J-bolt to hook through the hole until you're done welding.

                  jack vines

                  Comment


                  • #10
                    Had this same problem more than once.

                    Each of the 3 (per side) body supports has a nut on the inside welded to the top of the frame. Fortunately, they should (not sure 100% anymore on all of them) line up with a large drain hole on the bottom that is centered on the plates riveted to the frame bottom flange where the body mount sits on. Certainly the A mount has this hole. You may need to take the batwing off to see it.

                    The attached shows the hole (frame is upside down laying on the garage floor). These are normally riveted but the picture shows bolts since I had to remove the plate to fix some severe rot. In fact, the entire bottom plate of the frame was replaced for about 5' from behind the front cross member to 1/2 way under the seat...

                    You can hold a flange nut up from underneath with a long socket through the drain and weld in from the top if accessable there or just start onto the bolt.
                    Attached Files

                    Jeff in ND

                    Comment


                    • #11
                      You could try one of these:


                      You drill out the hole or see if you can hammer away the nut. Then you slip one of these


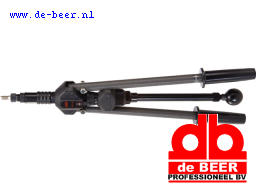
                      in the hole and pull it like a blind rivet with a tool like this which fits with a threaded tip in the thread of the nut.


                      If you do it right it it is strong enough. These are all metric and I don't know the name of the stuff in English but I'm sure you can find it in the US in SAE sizes.
                      The Blog: http://dutchstuderesto.wordpress.com

                      Comment


                      • #12
                        Originally posted by KJongenburger View Post
                        You could try one of these:


                        You drill out the hole or see if you can hammer away the nut. Then you slip one of these


                        in the hole and pull it like a blind rivet with a tool like this which fits with a threaded tip in the thread of the nut.


                        If you do it right it it is strong enough. These are all metric and I don't know the name of the stuff in English but I'm sure you can find it in the US in SAE sizes.
                        Great post and reply! Keep this picture handy. I am sure it will be needed repeatedly in the future. I have used these and I think they are called "Riv-Nuts" in English. There are several ways to solve the problem posted here in this thread. This is one of the neatest.
                        John Clary
                        Greer, SC

                        SDC member since 1975

                        Comment


                        • #13
                          I found this YouTube movie, see if it works
                          Last edited by KJongenburger; 12-17-2011, 05:36 AM. Reason: fixed link
                          The Blog: http://dutchstuderesto.wordpress.com

                          Comment


                          • #14
                            Yes, jclary said it all; great replies and I now have several ways to fix this RIGHT after I get the body off and have the naked frame to work with later.

                            Jeff H., what year is your car, again? Sorry, I should remember, you've sent me so much helpful info and photos on this already this year!!!!!
                            I would have thought the same thing, access holes under EVERY one of the nuts (I can see there are on other ones, i had been spraying their nuts with WD-40 occasionally..... in anticipation of removal someday) but as I probe the batwing area, my '57 does not appear to have a large hole centered on this one; there is a drain hole, but small and off-xenter, maybe because there are four OTHER bolt holes all around it to fasten the frame to the batwing itself? Until I get the body off and the batwing off, I'm not going to swear to it as maybe it is caked full of crud and I'm just not seeing it, but I've been shinng a shop-liight up through that SMALL drain hole trying to see what I was dealing with as well as probing with a drift pin originally and I get solid steel (or at least the feel of solid steel) under this bolt hole. We'll see. Regardless, the J-hook idea will carry me through the floor phase, and then I'll deal with it later.
                            I like the looks of those "Riv-Nuts" now that I see full cross-section and different styles, I must not have been looking at the right page (and admit I was impatient, wanting something I could do this weekend, not ORDER) :- ) I don't get many "full free days" to work on her, and today is ONE OF THEM!
                            BUT, now I'm going to look into those Riv-Nuts when I get the body off. Anyone already have a source? McMaster Carr or Grainger are where I'd start, or just google "Riv-Nuts" I guess..... But all in good time. Out to the shop to work with the hated sheet metal floor and brace!!! (can you tell I much prefer the mechanical parts of this hobby? :-)
                            Thanks again to all of you who replied!!!!!
                            Last edited by bsrosell; 12-17-2011, 05:55 AM.

                            Comment


                            • #15
                              yep, just watched the video. Regardless of where the access hole is on my frame (and maybe I'll find something squarely underneath when I peel off that batwing someday :-) I should be able to get one of those in without the special tool, even, by putting the mating clinch 'female' part on from the other side, since not really a 'blind' hole. Thanks for posting this.
                              Originally posted by KJongenburger View Post
                              I found this YouTube movie, see if it works

                              Comment

                              Working...
                              X