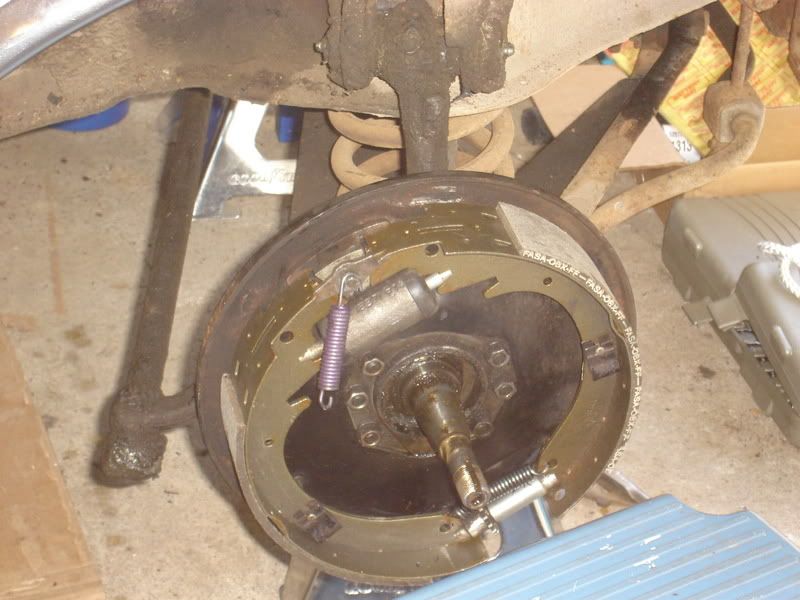
Doing drum brakes for the first time..No wonder I always liked disk...Tried doing it the book way and gave up half an hour later Whats the proper/easiest way to put the drum brakes, shoes, springs, etc..back together on a Hawk ????
-
-
[u]Disclaimer:</u> this is how I do it, and how I have had success doing it, other people may do it a different way which is fine.....<G>.quote:Originally posted by bonehead007
Doing drum brakes for the first time..No wonder I always liked disk...Tried doing it the book way and gave up half an hour later Whats the proper/easiest way to put the drum brakes, shoes, springs, etc..back together on a Hawk ????
First of all, I remove the backing plate and take the whole mess to the workbench where I have good light and don't have to sit on the ground. Getting old......<G>! That also allows me to blast and paint the backing plates if they are nasty (yes, I am quite anal about that sort of thing, N8 knows what I mean<G> . The fronts are easy, the backs require removing the emergency brake cable which is not too much harder. After all, you want to clean and lube the emergency brake cable, right?
The following is based on the '54 thru '66 style car "all drum" brake, front or rear; the rear drums on a disc brake car are slightly different but similar procedure. In fact, I am doing my '63 Lark disc/drum brakes right now.
On reassembly: lay the backing plate down, with the wheel cylinder installed. Set your brake shoes down in the correct orientation (primary and secondary shoes in the correct position). If these are rear brakes, install the emergency brake lever onto the shoe. Put a touch of Lubriplate or similar white grease on the 'pads' made into the backing plate where the metal portion of the shoes ride....not too much or it will make a mess on the friction material. Install the starwheel adjuster assembly and spring on the lower end of the shoes, and then lay the shoes/starwheel adjuster/spring assembly onto the backing plate. Install the shoe holddown pins and clips. Install the keystone-shaped block at the top of the backing plate (see shop manual for correct orientation), and the flat metal piece that goes over the block, and then install the two springs from the shoes to the top pin; this is the hardest part of the job, a brake spring tool helps. Make sure the springs are installed in the same sequence as the book shows - I always have the shop manual out when I do this, because supposedly it does matter which spring goes on first, and how the spring ends are orientated. Install the self adjuster hardware if your application uses it.
Now bolt the backing plates back onto the car and torque the bolts to the specs given in the shop manual, hook up the brake line, install the emergency brake cable if you are working on the rear brakes, and you are almost done. Install the drum/hub, and do a rough shoe adjustment so you can bleed the brakes and thus properly center the shoes in the drum by the hydraulic force of the wheel cylinder. Do a final shoe adjustment per the shop manual after the brakes are bled.
Hope this helps. If not, let me know what exactly you are having trouble with.
Paul
Visit The Studebaker Skytop Registry website at: http://hometown.aol.com/r1skytop/myhomepage/index.htmlPaul
Winston-Salem, NC
Visit The Studebaker Skytop Registry website at: www.studebakerskytop.com
Check out my YouTube channel here: https://www.youtube.com/user/r1lark
Check out my NOS Studebaker parts For Sale here:
http://partsforsale.studebakerskytop.com/ -
Never even thought of taking the plate off..Will have to look at back and see how bad it looks...I agree I'd like it to look good/like new b4 I put it back together..I'll try it this weekend using your method. thanks for the help, appreciate it...The car I'm installing the brakes on is a 58 Pkrd Hawk....Comment
-
I do it just like Paul outlined, but I don't remove the backing plates. I personally find it easy to clean them up while they are on the car and easier to assemble the brakes with them bolted down.
The first time you do them, you'll struggle and go slow. The second time you'll be more comfortable with them and they will be easier. By the third time, YOU'LL be the pro and answering the next brake assembly question on the forum [^].

Dick Steinkamp
Bellingham, WAComment
-
I too leave the backing plate on. I mount the wheel cylinders, the hook the shoes on the bottom spring and swing them up an install the pins. I hook the top spring on the pin then hook a thin screwdriver on the lose end on the spring. You then just put the screwdriver blade under the hook in the shoe and slide the lose end of the spring down the blade and it'll go right on the hook. Once the drum is off, it's a 15 minutes job.
JDP/Maryland
63 GT R2
63 Avanti R1
63 Daytona convert
63 Lark 2 door
62 Lark 2 door
60 Lark HT-60Hawk
59 3E truck
58 Starlight
52 & 53 Starliner
51 Commander
JDP MarylandComment
-
Gord Richmond, within Weasel range of the Alberta BadlandsComment
-
I have the brake tool..Got a brake kit at Sears Hardware.. Went to an auto parts store & they gave me a silicone gel to use, said its ok for drums..Will give it a try 2morrow..I appreciate all of your input & suggestions..If any of you are passing buy or want to take a trip to Northern NJ to "help" I've got beer in the fridge.....Comment
-
Actually gordr, I've got all of the drums off...I read the other article on the tech site about brake drums..The psngr side took approx 60 wacks with a hammer & took about 2-3 hours to "pop" off. it took only 4 wacks for the drivers side, about half a minute and "pop" off that came.....Comment
-
I remove the rear backing plates anyway to inspect and grease the rear wheel bearings and reset the axle endplay. The life of a set of rear linings (25 - 35,000 miles) corresponds with when the axle bearings need to be greased. I know, the shop manual says to grease them way more often, but a good grease seems to go these miles without a problem.quote:Originally posted by Dick Steinkamp
I do it just like Paul outlined, but I don't remove the backing plates. I personally find it easy to clean them up while they are on the car and easier to assemble the brakes with them bolted down.
Paul
Visit The Studebaker Skytop Registry website at: http://hometown.aol.com/r1skytop/myhomepage/index.htmlPaul
Winston-Salem, NC
Visit The Studebaker Skytop Registry website at: www.studebakerskytop.com
Check out my YouTube channel here: https://www.youtube.com/user/r1lark
Check out my NOS Studebaker parts For Sale here:
http://partsforsale.studebakerskytop.com/Comment
-
Finally tackeled the front drums today. I did it with the backing plate on . I appreciate all of the tips and help from everyone but, one question.
I've got the spring pullers but, how the %^#$ do you use them. I tried for 30 mins and just when I thought I had the spring on, boink, off she went...This is the first time I've tackeled drums.
Also, I put the grease on where the drums ride along the back plate. Is that correct ?? Do I also grease the top where the brakes have to set into ??Comment
-
Again I've never used the spring pliers.
I mount the wheel cylinders, the hook the shoes on the bottom spring and swing them up an install the pins. I hook the top spring on the pin then hook a thin screwdriver on the lose end on the spring. You then just put the screwdriver blade under the hook in the shoe and slide the lose end of the spring down the blade and it'll go right on the hook stretching it as it goes.
JDP/Maryland
64 Daytona HT/R2 clone
63 GT R2
63 Lark 2 door
62 Lark 2 door
60 Lark HT-60Hawk
59 3E truck
58 Starlight
52 & 53 Starliner
51 Commander
JDP MarylandComment
-
The drums shouldn't be touching the backing plates anywhere. The drums ride on the inner and outer bearings. Remove the inner seal, clean and inspect both bearings. Replace any worn bearings and races. Grease the bearings with a good quality wheel bearing grease. Reassemble with a new inner seal. I'd wipe the grease off where you put it. It could get thrown onto the shoes.quote:Originally posted by bonehead007
Also, I put the grease on where the drums ride along the back plate. Is that correct ?? Do I also grease the top where the brakes have to set into ??
Put just a little of the grease on the 4 spots on the backing plate where the shoes touch. Just a little.
Dick Steinkamp
Bellingham, WAComment
-
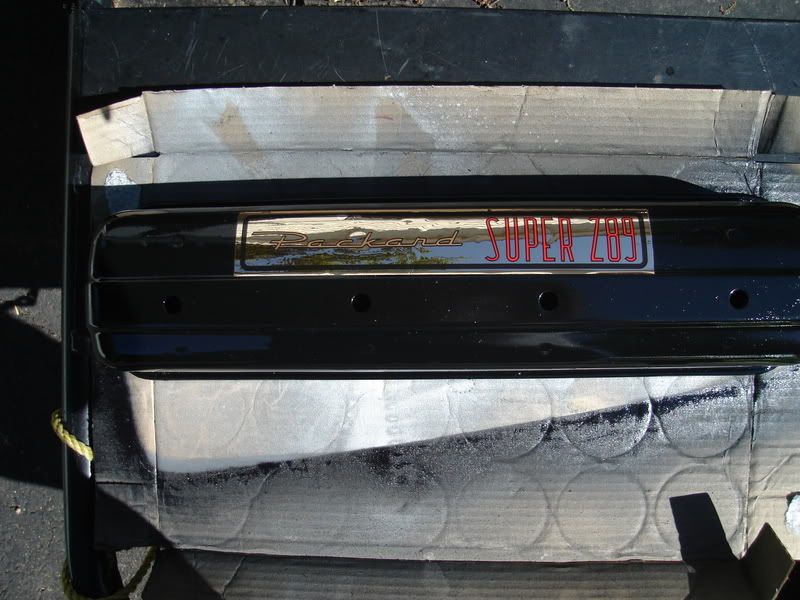
Had started on 1 brake and gave up..Continued and did one of the valve covers..Didn't want to sand blast so, cleaned off top with simple green, primed & repainted, added new label.
I see the 4 spots on the drum plate. Will take off the pads, clean & grease those 4. I'll give the srewdriver method a try. Thanks for the help. Only way to learn.
Have posted a few photos of brakes & cover. First time trying this too..

Comment
Comment