Announcement

Collapse
No announcement yet.

1952 one piece windshield install

Collapse
X
 
  • Filter
  • Time
  • Show
Clear All
new posts

  • 1952 one piece windshield install

    I am really not looking forward to this.
    I have read a few old posts and also have the shop manaul procedure, so i know the basics. A few questions I have for those more informed, based on what I read in the manual.

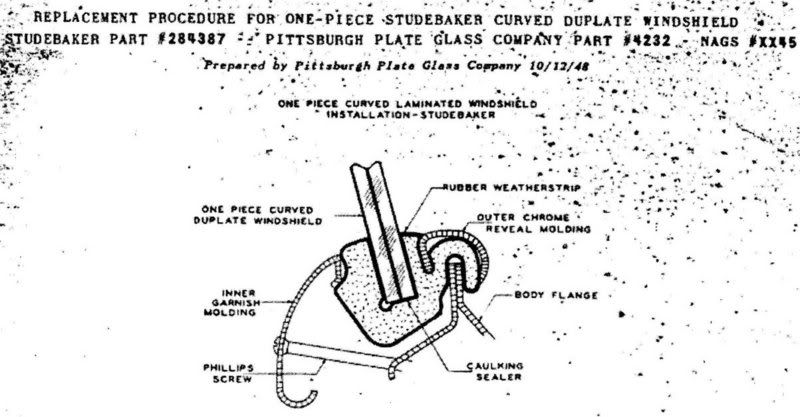
    Step 9 - "Clean all old caulking compund from around the weatherstrip and apply fresh sealer..." I have new weatherstrip, but does this mean some sort of sealer goes in the groove before its placed around the glass? What kind?

    Step 10 - "put a bead of sealer around the inside of the windshield flange." Again, what sealer? And wont this get all messed up anyway, seeing as how I plan to have soapy water slopped everywher?

    Step 11 - actual installation. "The ends of the cord should cross at top dead center". So I guess from inside the car you seat the top first..? Then pulling from outside the last bit of rubber to pop on would be the bottom center, and the cord is finally out? Seems like setting the bottom in first would work better.

    Dan
    52 hardtop

  • #2
    here is a nice picture that accompanies these directions. I hear installing the reveal molding is a royal PITA, but first I have to address headache numver 1, the glass.


    Dan
    52 hardtop

    Comment


    • #3
      Henry Votel,
      Forest Lake, MN
      Buying & Selling Studebaker Parts in MN & WI

      Comment


      • #4
        I happen to ibe installing a 65 Corvette windshield tomorrow. Same rubber gasket type. Be sure NOT to use the modern day sealant they are using on todays cars. This stuff gets hard and will not allow your glass to float in the rubber. I have tried many different types of caulk. I use 3m Bedding compound #8509. It NEVER gets hard and I place a bead in the rubber channel on both the glass side and the metal (Car)side first. Then after I have the glass set in the frame, I place tape all around the edge of the rubber(Outside Glass side)and peal back the rubber and lay a bead on the glass and rubber. At this point when you let go of the rubber it will squeeze out the excess onto the masking tape. Let it set for about an hour and put the tape off. It will give you a perfect cut line. Good luck.

        1956 Studebaker Pelham Wagon Houston, Texas
        Remember, \"When all is said and done. More is always said then ever done.\"

        Comment


        • #5
          good good good. I would not have used anything! Obviously I should not skip the caulk step.
          I have 3M strip caulk on hand, and good old black sticky weatherstrip adhesive. Are either close to the right consistency? Or go shopping?

          Now, on the rope thing. Seems to me (never having done it) that the windshield bottom should be set in place on the body flange. And the rope should be centered at top middle, then over and down the sides. Someone pushes the windoew in, and as you pull the rope out you seat more and more rubber - until the top middle pops in as the rope comes totally out. True?

          Dan
          52 hardtop

          Comment


          • #6
            No do not use weatherstrip. and yes go shopping. A tube is only about $7. On the rope thing. Yes I always start on the bottom.(reverse the rope so it also starts on the bottom, and yes have someone pushing on the glass) Place it in the grove and start. Do Not get shocked if the rope comes out an the rubber didn't set. I use a peice of round stock that has a 90" bend at the bottom (1 "end)that I pull the rubber with inch by inch. The rope thing works but unless you do alot of these it is a little tricky. Also the 3m I use doesn't set up so you have all day to finish. If you screw up just take the glass out and start agian. Biggest challange are the corners. You will have to work the glass and rubber back and forth and bend the rubber corners alot. You have to push on the outside of the glass at times (sliding it back and forth just a little), this is what is called working the glass. DO NOT USE A SCREWDRIVER OR ANY STEEL TOOL To PRY ON THE GLASS as you will be buying a new glass. When you are finished get some 3m glue and emblem remover(it comes in a can) and clean everything up. It will NOT hurt the paint. Good Luck, let us know how it comes out and remember NO HURRY you can make many attempts. Also wear thin rubber gloves as it is messy, but don't worry about getting this chaulking on anything as it will come right off with this cleaner.

            1956 Studebaker Pelham Wagon Houston, Texas
            Remember, \"When all is said and done. More is always said then ever done.\"

            Comment


            • #7
              This is all great information. I would add that it is good to remove any rough or bent areas on the body opening. They can make it more difficult to pull the rope through. If the car is being painted, this should be done before paint.

              Perry
              '23 Special Six,
              '50 Business Champ,
              '50 Starlight Champ,
              '60 Lark droptop,
              '63 GT
              Perry
              \'50 Business Champion
              \'50 Starlight Champion
              \'60 Lark Convertible,
              \'63 GT R1,
              \'67 Triumph TR4A

              Comment


              • #8
                I have to agree with KGlowacky do not use that strip caulk, been there done that in my 62 Lark, thinking that it is similar to Studebaker's caulk, well I ended up with new rubber covered with black goo and the windshield and back glass leaked worse than the 40 year old rubber I replaced. When I get around to putting the glass back in I am going to use that bedding compound mentioned or possibly urethane

                Comment


                • #9
                  Those instructions from PPG were included with a 1949 service bulletin and approved by the General Service Department. It's probably written for someone with previous glass experience.
                  What they are saying is to lay the windshield in place bottom first so that the seal is started over the flange, in a few places at least. Then start pulling the cord while pushing the windshield snugly against the flange.
                  If you have helpers, make sure they resist the urge to 'bump' the glass with their palms.
                  By the way, 1952 is the last year where the glass installs from the inside and the chrome trim is removed first and installed last.


                  Dwain G.
                  Restorations by Skip Towne

                  Comment


                  • #10
                    On my first glass install, I was shown/instructed by a glass shop friend, I learned one trick, don't use thin string. Use a thicker rope (I think 1/4" or 3/16" Nylon), it does a much, much better job at gently pulling the rubber over the flange. Also, use the bedding compound mentioned, I had forgotten what I used on my first car and called up Champ glass and asked. He said 3M bedding compound, item #8509. On the tube itself it says, it is a non-hardening compound for sealing many things, one of which it specifically mentions is the rubber for windshields. Also follow the tips above (especially KGlowasky, good tips), I didn't know one of them, so I learned something here as well.

                    Best Regards,
                    Eric West
                    "The Speedster Kid"
                    Sunny Northern California
                    Where the roads don't freeze over and the heat doesn't kill you.
                    And an open road is yours to have -only during non-commute rush hours 9am-4pm and 7pm to 7am (Ha, ha, ha)
                    55 Speedster "Lemon/Lime" (Beautiful)
                    55 President State Sedan (Rusty original, but runs great and reliable)

                    Comment


                    • #11
                      Google supplied these places that have simple websites and are about $7 a tube for 3M bedding compound.
                      repaintsupply.com
                      levineautoparts.com

                      Luckily the Ridge & Kramer down the road carries paint stuff and had one tube left. I'll let you know how it turns out.


                      Dan
                      52 hardtop

                      Comment


                      • #12
                        Just finished my windshield installation today. I want everyone to promise me that you will NOT ever use anything other then the bedding compound. I was talked into trying a tube of new so called non harding (urathane)caulking from a glass salesman. What a mess. They were correct when saying it will not harden but is will stick to everything and is so stcking you can't even slide the window around to fit. This stuff is for the newer winshield applications with no gaskets. . Stick with the bedding compound and DON'T listen to the glass sales people. They have no idea what you are working with , TRUST ME. After 4 hours of trying to install and removing and CLEANING EVERYTHING. I went back got a tube of bedding compound and 20 minutes later I was done.

                        1956 Studebaker Pelham Wagon Houston, Texas
                        Remember, \"When all is said and done. More is always said then ever done.\"

                        Comment


                        • #13
                          When I had a new glass installed in the Transtar 11 years ago, the glass guy was an experienced fella that I'd known for some years. Heh - that's why I'd called on him to do the install for me.
                          We argued for some time about the sealer (dum-dum) that's supposed to go between the glass and the body. He was adamant that since I had a brand new gasket, I wouldn't need sealer. I argued that they used sealer at the factory where they never used anything BUT new parts!
                          Well, he won. Wore me down actually. Glass went in without any sealer whatsoever. First damned rainstorm I got caught in, guess who got soaked?

                          Miscreant adrift in
                          the BerStuda Triangle


                          1957 Transtar 1/2ton
                          1960 Larkvertible V8
                          1958 Provincial wagon
                          1953 Commander coupe

                          No deceptive flags to prove I'm patriotic - no biblical BS to impress - just ME and Studebakers - as it should be.

                          Comment


                          • #14
                            I agree with sealer, just use some old time stuff,(dum-dum,bedding compound)not this modern age stuff. And my guess is Mr. Biggs.(got wet)

                            1956 Studebaker Pelham Wagon Houston, Texas
                            Remember, \"When all is said and done. More is always said then ever done.\"

                            Comment


                            • #15
                              quote:Now, on the rope thing. Seems to me (never having done it) that the windshield bottom should be set in place on the body flange. And the rope should be centered at top middle, then over and down the sides. Someone pushes the window in, and as you pull the rope out you seat more and more rubber - until the top middle pops in as the rope comes totally out. True?
                              Yep, pretty much. We re-installed the front and rear glass in my '59 a few weeks ago with that method. Worked perfectly.

                              __________________________________

                              Matthew Burnette
                              Hazlehurst, Georgia
                              '59 Scotsman PU
                              '63 Daytona HT

                              Simply Orange

                              Comment

                              Working...
                              X