Announcement

Collapse
No announcement yet.

Rebuilding the hood on a '54 Champion

Collapse
X
 
  • Filter
  • Time
  • Show
Clear All
new posts

  • Rebuilding the hood on a '54 Champion

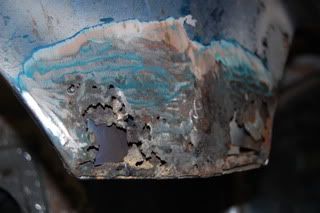
    I am to the point in my restoration where I need some ideas on the rebuilding the nose on a '54 Champion Starliner HT. It is extremely rusted and continued through the bondo put on 30 years ago.
    Is it best to weld in new metal or fiberglas over the rust holes as I have it ground down to the metal?
    Any help would be appreciated.
    John T.

  • #2
    I have never seen a fiberglass patch last on a steel hood, maybe its the vibration or extensive heat/cool cycles hoods are subjected to, but fiberglass is a no no. If it was my hood I would repair it with metal, or if it's too far gone then locate a good metal one ($$$$) or consider replacing it with a fiberglass one. Just don't mix the two on a hood. My dad was convinced fieberglass was the way to go when he repaired my car's rear quater panels in the early 70's. Although the patches have held up surprisingly well, they are starting to show up now. My hood had a hole in it from a hood scoop that was repaired with metal that was welded in around 1970, that joint has lasted and is what I consider permanent. Back in the day when we would put Z-28 and L-88 fiberglass hood scoops on our hoods, the fiberglass to metal joint would only last for a few years, did't matter if the scoop was riveted, epoxied, or just glassed on...the joint never lasted. Junior.


    54 Champ C5 Hamilton car. In my family since 1958.
    sigpic
    1954 C5 Hamilton car.

    Comment


    • #3
      The old weld metal in and bondo it, seems to
      apply here. Or maybe it's better to say body
      filler. O, you could weld metal in and lead it.
      It seemed that worked for the factory???

      Tex E. Grier

      Comment


      • #4
        You just have to cut out the old rusted and thin metal and make pieces to fit. Take some cereal box cardboard and make patterns. Try to find some sheet metal from old body parts to match the curves as best you can, and cut them to fit within the opening. After you have all of the pieces of the puzzle trimmed to fit together nicely, it needs to be mig welded together. I always have an air hose handy to cool it down and weld only about half inch at a time, to avoid warping.

        Comment


        • #5
          Thanks everyone, I am a beginner at MIG welding and was thinking welding might lead to a lot of grinding but its sounds like the way to go.I have used POR 15 with fiberglas cloth on some of the areas that won't show but don't think that will work here.The area to replace is not to big and is right on the nose at the bottom.

          Comment


          • #6
            John can you post pics of exactly where on the hood you are looking to replace,may help in adviseing.

            Joseph R. Zeiger
            Joseph R. Zeiger

            Comment


            • #7
              Thanks, Joseph, I will take some pics of the hood and put them on.

              Comment


              • #8
                It is a real S.O.B. to weld in the center of that flat hood, something that should be left to an experienced (old school) body man. In the front area with curves, it would be easier. I scrounged a hood off of a '60's car in a local scrap yard and made a lot of patches for various projects. Metal from a new car does not work as well because it has a different alloy. PRACTICE, PRACTICE, PRACTICE first, then attack that "hard to find a replacement for" hood. Just straightening out the kinked rear corners of a coupe hood is enough to drive a man to drink. That front edge was always prone to rusting, I am surprised that Classic Enterprises has not made a patch panel.
                Good luck!

                duane miller

                Comment


                • #9
                  Its not necessary to do too much cooling while welding if using a MIG. Once you get your patterns cut in the correct gage metal, tack it in place first, then stitch weld it. Do a little light hammer/dolly work to get it flat, grinder action next, then you're good to go on the filler. It'll last longer than you will.

                  sals54
                  sals54

                  Comment


                  • #10
                    [IMG]http://i831.photobucket.com/albums/zz232/jmtipps/studes/stude%20restore/015.jpg[/IMG]
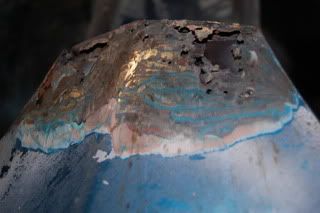
                    Here are some pics of the area that need to be fixed. I have another hood but it flew up years age bending the back corners.John T.

                    Comment


                    • #11
                      John, I would surely make metal patches,have them underlap the upper area.how are the sides and bottom edge?(solid or swiss cheese)

                      Joseph R. Zeiger
                      Joseph R. Zeiger

                      Comment


                      • #12
                        I think these rust out due to lack of a good drain in the nose at the bottom. Water leaks in around the mounting studs for the hood emblems and collects down there. I've washed my car and thought it was dry, only to open the hood and have water drip out of the nose when the angle changed. Been meaning to put some goop on those stud holes.... I welded a small patch in mine like what you will need to do after sanding the area and finding it full of pin holes, and covered it with body filler. Make sure the back/inside gets a good coat of paint when done.

                        Jeff in ND

                        '53 Champion Hardtop

                        Jeff in ND

                        Comment


                        • #13
                          I welded in some new metal along the bottom and the underside of the nose.The side curved edges along the bottom has some holes also. After sitting outside for 25 years I guess I should expect that the nose would get rusted out. Does anyone know what is the guage of the hood metal?

                          Comment


                          • #14
                            That doesn't look as bad as you first indicated. You should be able to fix it with ease. Don't worry about the gage... use a whizzer to cut out the area, the edge of the cut will tell what thickness you need. Just stare and compare at the metal yard.

                            duane miller

                            Comment


                            • #15
                              I like to use 18 ga sheet metal. It's still thin enough to bend and heavy enough to MIG weld easily. If the rusty area blows through, it's heavy enough to run the wire off of to fill the void.

                              If it were me, I'd cutout the swiss cheese but not cut out the crown of the hood. I'd patch on both side and leave the crown to locate the original contour.

                              Once the swiss cheese is cut out, slip a thin piece of cardboard behind the hole that is left and trace the outline. Cut the metal and butt weld. If you are not comfortable with the butt weld, make the patch oversize and overlap. If you overlap, put the good metal underneath so you are running from old onto new.

                              Be sure to stitch weld to minimize warping which should be easy to control due to the contours, grind gently and use Evercoat Gold filler to blend the contours.

                              It will look fine

                              Bob

                              ,

                              Comment

                              Working...
                              X