Announcement

Collapse
No announcement yet.

Installing new Classic front body support arms- a couple questions

Collapse
X
 
  • Filter
  • Time
  • Show
Clear All
new posts

  • Body / Glass: Installing new Classic front body support arms- a couple questions

    OK, now that I finally fought one of the original front mounts out ('57 Golden Hawk), it is time to put the new Classic body support mount in.
    Looking things over and recalling how they came apart, I have two questions:

    1) the original support had three bolts through it: the Classic piece has TWO bolt holes (both inboard). No problem drilling a hole in the outboard area for a bolt, but it occurred to me that I had the luxury of breaking that bolt off while I had the floor cut out. :-) (You can just see the raised "mound" of the remains of a nut on the outboard end of the original in the attached photo) So, I assume I'll need to weld a nut to the Classic piece in the same location as the original rusted-out nut was.... There appears to be quite a bit of room in the batwing hole to allow adjustment later, so should be ok 'getting close" with the drilled hole and welded nut"? Don't have to have the whole thing 'assembled" and in place and floor tacked in, etc... before doing so? Which leads me to question #2:

    2) finally occurred to me (this is my first time at this, forgive me) that the new floor piece is going to have to go in and at least get screwed down for "final fit" before I can finalize the position of the new Classic body support arm... because the FLOOR is between the cowl pillar and the end of the body support. So I can't weld the support arm to the cowl pillar (and the new floor) until it is ALL final.
    I suppose I CAN spot-weld the torque boxes to the body support arm, then put the new floor on, assuming I can slip the floor between the pillar and raised outboard end of the body support arm.

    This whole thing is all interlinked and intertwined, much more so than I had imagined! Even the torque boxes had one on top, the other on the bottom, making the hunt for spot welds oh so much fun! :-) Here is the "rejected" and "ejected" mount this afternoon, and the now-vacant torque boxes:
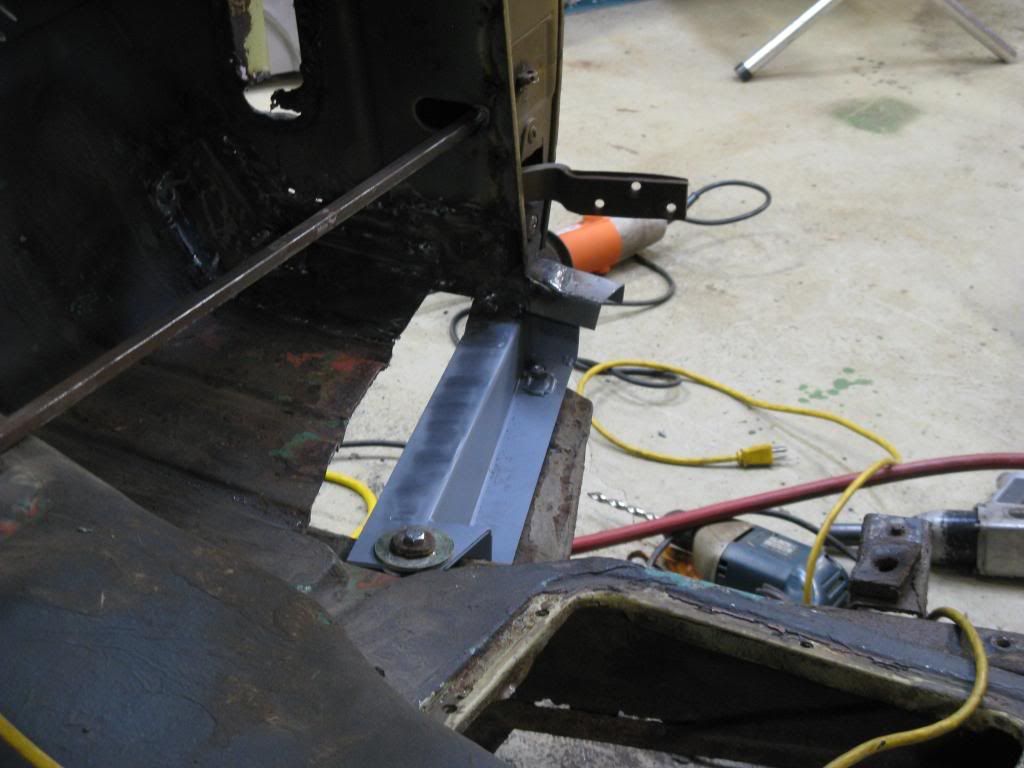
    Attached Files

  • #2
    Front Body Mount

    because the FLOOR is between the cowl pillar and the end of the body support.
    I don't think so.

    On the two cars I have done, I bought the piece that goes up into the A post that the front body mount connects to. It also has a mounting point for the floor boards and locates the top of the rocker panels. I put the A post piece in, then mounted the body mount, then put the new floor boards in. The floor boards were not under the A post, but sat on top of the new bracket. I put the floors in to check the fit with the bracket, the rockers, and the door before I welded anything. When I was happy, I welded a nut on the bat wing end of the bracket, then screwed the bracket to the frame and welded the A post end in. Then the floors went in.
    Bill
    http://www.rustyrestorations.org/index.php
    sigpic

    Comment


    • #3
      No replies so going fishing again. :-)
      is this the way to install the new Classic front body supports??
      1) Have to install the support 'loose", position it and install with all three bolts (one new hole to drill and corresponding nut to weld in the Classic piece, at outboard end), and
      2) THEN spotweld the frame support to the torque boxes before that interface gets covered up by the new floor piece,
      3) THEN slide new floor ABOVE support at pillar, between it and the cowl pillar, and get new floor tacked down in place before welding the support to the pillar AND new floor? (so, there will again 3 layers there, so don't know how else you'd do it...)

      [QUOTE=bsrosell;596153]OK, occurred to me (this is my first time at this, forgive me) that the new floor piece is going to have to go in and at least get screwed down for "final fit" before I can finalize the position of the new Classic body support arm... because the FLOOR is between the cowl pillar and the end of the body support. So I can't weld the support arm to the cowl pillar (and the new floor) until it is ALL final.
      I suppose I CAN spot-weld the torque boxes to the body support arm, then put the new floor on, assuming I can slip the floor between the pillar and raised outboard end of the body support arm.

      Previous post (first one, above) shows photos. QUOTE]
      Last edited by bsrosell; 11-25-2011, 06:39 PM.

      Comment


      • #4
        ah, someone DID reply! Thanks! (while I was typing my 2nd request I guess)....
        You said:
        Originally posted by clarkwd View Post
        The floor boards were not under the A post, but sat on top of the new bracket. I put the floors in to check the fit with the bracket, the rockers, and the door before I welded anything. When I was happy, I welded a nut on the bat wing end of the bracket, then screwed the bracket to the frame and welded the A post end in. Then the floors went in.
        Bill
        [/IMG]
        I THINK we are saying the same thing...???? The floor sits on top of the new bracket, and the bracket fits up into the "A post" (I've been calling it the cowl pillar....). So, from the sounds of your sequence, I am on the right track. Have to have it ALL "fit" (bracket and floor) loosely, before you can start welding the bracket to the torque boxes.... and THEN you can put the floor on....and FINALLY you can weld the little area UNDER the A-post, through both bracket, floor, and onto the post.....
        Just hard to describe. :-)

        You make a good point: I should tack both those (support mount and floor), re-mount my door, and then fit and tack the rocker, BEFORE I really go at welding any of them "final"...... Would be a heck of time to find the door is crooked after all that work on the support mount and floor ;- )
        Last edited by bsrosell; 11-25-2011, 06:47 PM.

        Comment


        • #5
          Originally posted by bsrosell View Post
          ... Would be a heck of time to find the door is crooked after all that work on the support mount and floor ;- )
          Having BTDT... I know you don't want to hear this but..
          You have the door removed...
          When the body was built, the floor came down the line first, in a jig and the upper body/cowl was lowered on to it and spot welded. Later the doors were fitted and adjusted. Right now, you're somewhere in that process
          If, with all the rust removed, you have 'air' under the pillar support, then you've lost the door fit registration point. The bottom of the pillar can now move with the weight of the cowl, windshield, etc. So the prudent thing to do would be to mount/fit the door, close it tight and support the lower pillar with a floor jack, then (with door closed) weld struts from the kick panel to the trans hump and the firewall ramp to the closest good spot on the floor, BEFORE your weld in any part of the replacement parts.
          You'll have to tack weld the floor with the door closed to maintain the fit.. Once located and set, you can open the door to finish, but continue open/closing to see how things have progressed
          and I can't comment on how much wiggle room they had at the factory, but 1/4" will shout as loud as H**l if it's in the wrong direction
          Last edited by 64V-K7; 11-26-2011, 01:57 PM. Reason: grammar
          64 GT Hawk (K7)
          1970 Avanti (R3)

          Comment


          • #6
            Make sure that the frame is supported by the wheels!! The same way when it is supported when on the ground! Otherwise, when you let it down, your body lines can and will change. Be sure to also fit the door, 1/4 panel & rocker panel use sheet metal screws to hold it in place a while adjusting the gaps. Once you are happy with the gaps, start welding AND checking fit as you go. It IS tidious work and very time consuming, but the results will be worth it.

            Jim
            "We can't all be Heroes, Some us just need to stand on the curb and clap as they go by" Will Rogers

            We will provide the curb for you to stand on and clap!


            Indy Honor Flight www.IndyHonorFlight.org

            As of Veterans Day 2017, IHF has flown 2,450 WWII, Korean, and Vietnam Veterans to Washington DC at NO charge! to see
            their Memorials!

            Comment


            • #7
              Just cut/ground/peeled out the last of the floor-panel out from under and inside the A-pillar. Was pleased to find I now had access to weld in a new cage nut for the lower fender screw (which had also broken off during disassembly....). Regarding the apparent discrepancy between ClarkWD's experience with the floor between the post and what I have, I'll bet it is the fact you (Clark) used the pillar support and that has the steel extension seen in your photo, so I suppose you have to cut the Classic floor pans to butt or overlap at THAT point instead.
              For me, and believe me I just spent a few hours getting it pulled out, the floor went all the way under the A-pillar (and had been on top of frame support), and my new Classic panels have the outer edge of the floor that also goes all the way under the A-pillar. I got the new floor rough-cut today, close enough so I could maneuver it around and check how far up to cut it....
              Progress, but SLOW........ 52 Ragtop, yes, I have a jack under the front quarter to give a little separation to move things around and get floors 'underlapped', etc.., but will drop to "only tires" and just enough jack under cowl to "just support" and get same level as before cutting. I hope. :-)

              Comment

              Working...
              X