-
 I'd rather be driving my Studebaker!
sigpic -
Make a U shape out of some 2x4's with an inside width to match the oil pan and a length to allow you floor jack to fit under it. Brace the U so it won't spread apart and place it up against the pan flange area and jack the motor up. That would be what I would try anyway.
Ken -
Thanks, I'll have to take some measurements and draw that up.Originally posted by jd-stude View Post I'd rather be driving my Studebaker!
sigpicComment
-
32 Ford mounts...? What do they look like?
Chris.Comment
-
Through bolt style mounts instead of the constantly breaking bonded mounts. Other ways to do it, just one of many--not the simplest. http://www.ebay.com/itm/like/2718160...lpid=82&chn=psOriginally posted by stude dude View PostComment
-
I'm doing the exact same thing on my '62 Hawk this weekend.
Clark posted a description of the process on http://studeblogger.blogspot.com/201...1_archive.html.
One difference on our Hawks is the heater/Climatizer hoses pass in front of the right rear mount bolts, if so equipped.
Making a brace to protect the pan is a good idea. As everyone says, DON"T FORGET THE SPACER ON THE LEFT REAR MOUNT!
Maybe I'll post here how it went when I'm done. Though I suspect mission creep might force another thread altogether. First hour was removing crud older than me.Andy
62 GT

Comment
-
What a can of worms! I made a U shaped lifting bracket out of 2x4s and plywood. Lifted the engine slowly and removed the old motor mount from the drivers side. As I'm using 32 Ford motor mounts I have to modify the lower bracket so it has to be removed. If I could find the design engineer who put the bolts for the lower bracket INSIDE the hollow cross member I'd slap him upside the head. Why do so many engineers forget about the fact that cars have to be worked on? I'd rather be driving my Studebaker!
sigpicComment
-
Here's what they look like installed.Originally posted by stude dude View Post
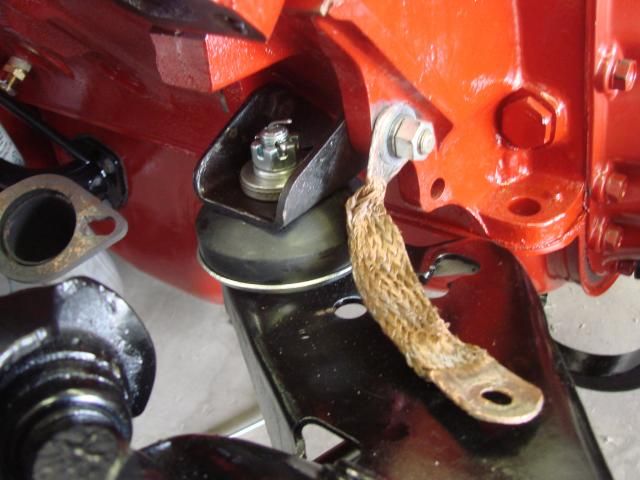
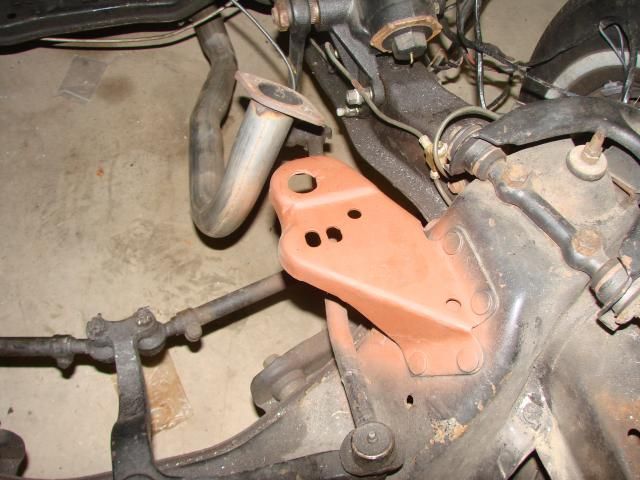
Here's what the frame bracket looks like modified to fit.
Comment
-
About ready to start round 2 of my fight with the lower motor mount bracket bolts. If I could just get a wrench or socket on the bolt head inside the hollow cross member it would be a piece of cake. I might have to make a trip to Sears to see if they have an extra long 9/16 box wrench. If not I'm gonna haft ta get something welded up that will reach up in there.
 But on the bright side look at all the fun I'm having.
  I'd rather be driving my Studebaker!
sigpicComment
-
Because their design was perfect already. Who knew 50 years later, people would be tired of putting new engine mounts in their cars because they kept breaking! After all, they were only supposed to last 5 years tops, before the whole car was supposed to be replaced with a brand new one! Seemed like a good idea at the time. Who would want to put 1932 Ford motor mounts on a technically advanced 1962 automobile, after all they were all at the crushers already since their designs weren't any good.Originally posted by wlfrench View Post

Comment
-
Heh heh. No doubt the same evil genius engineer who designed the cramped-opening, head-spiking hawk hood!....Originally posted by wlfrench View PostComment
-
Poll Question: Who has broken a newly replaced engine mount after removing the original 50+ year original ?? I've never heard of it..... I'm curious. If I were breaking mounts, I'd be careful about modifying the original bracket w/o some buttressing.....Comment
-
Years ago I had a Hawk (loved that car) that had mount problems. One day I decided to solve my mount problem and proceeded to change out the bonded mount with a bolt through mount I had purchased from the local Ford dealer. I started the procedure by placing the car on stands, then loosening and raising the engine. After a couple of hours of work trying to remove those four bracket bolts (without removing the front suspention) I decided that the bonded mounts were not the problem but could be traced to my driving habits. So I went down to the parts store, bought a new bonded Studebaker mount and installed it, took my Ford parts back to the Ford dealer. With the engine out of the car or the front suspention removed, the mount modification would have been rather simple. In all the years I owned the car I only replaced that left mount once. And by changing my driving habits I probably also saved a lot of money on u-joints, transmission parts, and many other items too numerous to mention. Sure wish I had that car back!
Dave.Comment
-
Well this is the replacement, of a replacement, of a replacement-does this count?
And no oil-dry as a bone, just junk bonding.Attached FilesLast edited by karterfred88; 07-12-2015, 09:31 AM.Comment
-
-
It took a while, but I installed new mounts this weekend on my '62 Hawk.
Lacking a proper lift/hoist, I used the technique outlined by Clark (as related to him by Gord). The only difference was that I installed the front mounts first.
If Cllimatizer equipped, you will have to disconnect the large hose from the lower duct. If your heater hosed have some slack, you can move them enough to get to the mount bolts on the side of the case. It ain't easy. but you can reach them through the fender well. If the front wheel is removed, all the easier.
The nut size on my rear mounts was 5/8" not 9/16". On the rears (especially the right side) you should be able to get a wrench in that crossmember. If you don't have clearance to remove the nut, you will once you raise it.
Slow and steady wins the race. A 9" x 12" piece of plywood fits the transmission pan perfectly, and I suffered no dents mostly because I was extreeeeeemely gentle and slow with raising and lowering. In doing so, nothing shifted much and everything lined back up just right when replaced.
I only encountered one issue - the threads on the rear mount base studs are finer (7/16" - 20) than those they replaced so new washers/nuts were required.
New and old front mounts:Attached FilesAndy
62 GT
Comment
-
Thank you for visiting the SDC Forum, a service of the Studebaker Drivers Club, Inc., an International non-profit organization dedicated to the promotion and preservation of Studebaker automobiles.
Our Forum is free to use, but in order to join the discussion boards you will first need to register.
Read our Policies and Terms Of Service here.


Comment