Announcement

Collapse
No announcement yet.

Water in the bellhousing

Collapse
X
 
  • Filter
  • Time
  • Show
Clear All
new posts

  • #31
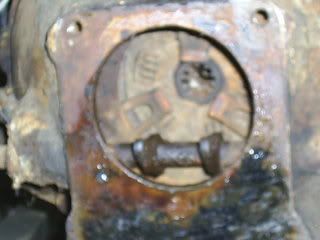
    Drilling a hole in, or notching the bottom edge of, the dust cover shouldn't hurt and might help. It seems that some of my other brand cars have had a small hole in the dust cover. I will certainly cover the top hole in the bell.


    1952 Champion Starlight, 1962 Daytona.Searcy,Arkansas
    "I may be lazy, but I'm not shiftless."
    "In the heart of Arkansas."
    Searcy, Arkansas
    1952 Commander 2 door. Really fine 259.
    1952 2R pickup

    Comment


    • #32
      as far a other water getting in wouldn't the temp cause it to evaporate before it could build up?

      Kevin Phillips
      Jacksonville,AR
      57 Silver Hawk
      Kevin Phillips
      Jacksonville,AR

      53 commander

      Comment


      • #33
        For a car driven every day it might not make as much difference. Also if the car was kept in a nice dry garage it wouldn't be in the rain much except when being driven. Unfortunately my car does meet either of those requirements.


        1952 Champion Starlight, 1962 Daytona.Searcy,Arkansas
        "I may be lazy, but I'm not shiftless."
        "In the heart of Arkansas."
        Searcy, Arkansas
        1952 Commander 2 door. Really fine 259.
        1952 2R pickup

        Comment


        • #34
          I thought I would post an update on the clutch situation. My brother and I caught the same day off Monday and pulled the engine. I thought I was being smart by getting pictures, but once again I forgot to check if I was on close-up. Anyway, you can get the idea.
          I had the front cap off and most of the linkages and wires already disconnected several days ago. We started about 10:00 AM and I thought the engine would be out by noon. All we had to do was disconnect the exhaust, clutch linkage, and remove the carb and we would be ready. If you had asked me I would have guessed 2 hours to get the engine out would be plenty. []
          We got the exhaust off after I managed to break two of the studs. The clutch linkage took much longer to remove than I thought and the only part that came off like it should was the carb. We were in 2 hours already and stopped for lunch.

          We nosed the car into the garage so we could have the engine hoist on a concrete floor. We attached the hoist and started lifting the engine and transmission, but the rear mount did not clear the cross member. [V] No problem we'll just remove the cross member because it needs some straightening anyway!

          The cross member removal was a nightmare! 
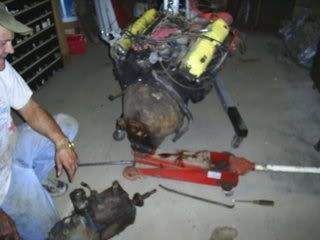
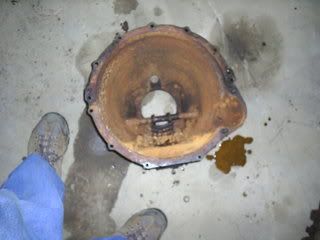
Joe started on one side and I on the other. A few of the nuts came off easily, but some were almost impossible. Both of us had a terrible time keeping a wrench on the bolt from the top while turning the ratchet from the bottom. Joe tried an air chisel with no success, ruined his Dremel tool and finally ground away enough of the last bolt with a air grinder to get it out. It was now about 6:30 and we were just beginning to lift the engine.
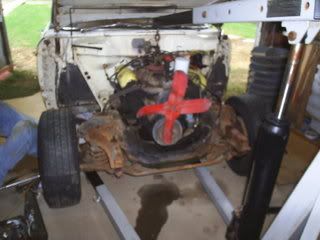
          Finally we eased it out past the front cross member and away from the car!
          Then another fight started. Although we unbolted the transmission it did not want to come out! After much tapping with a hammer and prying and pushing the transmission finally came free, bringing the throwout bearing with it. The throwout bearing sleeve was firmly stuck on the bearing retainer.


          When we got the bellhousing off we found the cross shaft stuck in it's place. It is now soaked with solvent waiting for disassembly.

          At last, after carrying an engine block around behind the garage, moving the car back outside, putting up lots of tools and storing the parts I had removed, we were able to put Joe's truck back in the garage. Joe looked like he had mopped the floor and we were both sweaty and VERY tired! Notice it is now dark.


          We ate supper at about 8:00 PM. What a day! [:0]


          1952 Champion Starlight, 1962 Daytona, both w/overdrive.Searcy,Arkansas
          "I may be lazy, but I'm not shiftless."
          "In the heart of Arkansas."
          Searcy, Arkansas
          1952 Commander 2 door. Really fine 259.
          1952 2R pickup

          Comment


          • #35
            Why do you guys keep pulling the X member when doing a swap ? I never have unless I intended to detail the darn thing or swap in a brand X engine.

            JDP/Maryland
            "I'm a great believer in luck and I find the harder I work, the more I have of it."
            Thomas Jefferson
            JDP Maryland

            Comment


            • #36
              Thanks for posting the pics and story, 52-fan. Like Deepnhock, I love seeing the "in process" photos! In this case, it all looks very familiar (except my fenders stayed on).

              When you put it back together, that x-member will be just as much of a booger. You'll need to bolt in in loosely so you can move it around to allow the mounts to line up. By the way, SASCO still has some thicknesses of the rubber shims that go on the outboard bolts, if you need 'em.

              Good luck!


              [img=left]http://members.cox.net/clarknovak/lark.gif[/img=left]

              Clark in San Diego
              '63 F2/Lark Standard

              The Official Website of the San Diego Chapter of the Studebaker Drivers Club. Serving San Diego County

              Clark in San Diego | '63 Standard (F2) "Barney" | http://studeblogger.blogspot.com

              Comment


              • #37
                Oh geez, I hate to be "that guy" BUT..... I hope no one was under that car when you had the front wheels up on concrete blocks, please say no.

                Randy Wakefield
                ----------------------
                1955 President sedan

                "For the future that we wait..."

                Comment


                • #38
                  I would not have ordinarily pulled the cross member, but it is bent and needs straightening. I could have pulled the distributor so we would have had more jiggle room and gotten it out. It is the first time I ever pulled an engine with the transmission attached. If I had to do it again I would probably strip more of the engine ahead of time and not mess with the cross member, but once we started we hated to leave it half out.
                  What looks like concrete blocks in the fuzzy picture is blocks of wood nailed together and the car was well shaken and pushed before anyone went under it. A solid stack of wood like that won't collapse, but I am very aware of the possibility of the car coming off if it is not secure.
                  The attachment points for the body to the cross member will have to be rebuilt along with some of the floor before I can shim and adjust the fit. The rest of the floor is excellent.


                  1952 Champion Starlight, 1962 Daytona, both w/overdrive.Searcy,Arkansas
                  "I may be lazy, but I'm not shiftless."
                  "In the heart of Arkansas."
                  Searcy, Arkansas
                  1952 Commander 2 door. Really fine 259.
                  1952 2R pickup

                  Comment


                  • #39
                    A Stude mechanic friend sent me this...

                    Saw the thread about the "mouse hole" and cowl vent drain...
                    Here are some things you might add...
                    The early (61-2) indeed are different than the later (63 up) as the cowl changed completely in 63. The "tray" that attaches to the cowl with funky clips is not rubber (may have been at one time but I never seen one) but appears to be plastic that falls apart after all these years (imagine that!) and no longer holds the hose, which has a metal end sleeve that connects the hose and the tray. The tray have been
                    unobtainium for a while now, Danny and I tried to find one with no luck. It is hard to find in the parts book, I found it in a strange place and showed it to Danny but can't remember exactly where....think it was in the "accessory" section or in the back somewhere. I sure wish the tray would get repopped as EVERY 61 or 2 needs a new one! The later (63 up) hose has a formed end on it and doesn't use the stupid tray....
                    The "mouse hole" is not only for ventilation, it is a relic from the old days when you could stick a grease gun in it and grease the release bearing. ALSO....if the water is left in there for a long time it will fill up the tranny and kill it. The 3 speeders have no front seal, just return grooves....water goes right in. Water also rusts the discs to the shaft and the release bearing to the collar and makes the tranny a real bear to remove...
                    I like Jeffy's idea to drill a hole in the lower dust plate but many do cover the mouse hole with something. BTW, it isn't called a mouse hole for nothing, either! -George

                    Matthew Burnette
                    Hazlehurst, GA

                    Comment


                    • #40
                      Maybe if I'm lucky, someone at the Branson show will have a 61 or 62 with a stock drain box I can look at. When I make a replacement I would like it to appear that it belongs and not just cobbled up.


                      1952 Champion Starlight, 1962 Daytona, both w/overdrive.Searcy,Arkansas
                      "I may be lazy, but I'm not shiftless."
                      "In the heart of Arkansas."
                      Searcy, Arkansas
                      1952 Commander 2 door. Really fine 259.
                      1952 2R pickup

                      Comment


                      • #41
                        I didn't realize that the '61 and '62 cars used a different cowl drain than the '63 and later ones.

                        If authenticity is not an issue, now is the time to fabricate a replacement for the unobtainium part. I'm not a big fan of the later-style drain hose, either. It has two drawbacks: one, the end is formed like a grommet, so it can really only drain the cowl down to the lower edge of the I.D. of the hose, leaving a residue in the cowl, and secondly, a drain in the center is really only effective if the car sits 100% level. The best setup, IMHO, would be to have drains on both ends of the ventilator box, formed as depressions in its floor.

                        As far as the mousehole in the bellhousing goes, seems to me it would be prudent to fabricate a little cap for it, like a louver. Envision a shallow tray of sheet metal 2" by 2", with a 3/8" flange on 3 sides. Make it 1/4" deep. Form it to the curvature of the bellhousing, and screw it on over the mousehole using 6 little self-tapping screws, the open side pointed down, of course. It could be sealed with silicone so water couldn't seep in from the topside. Would still provide a little ventilation, although I note that other makes do not ventilate their bellhousings.

                        Gord Richmond, within Weasel range of the Alberta Badlands
                        Gord Richmond, within Weasel range of the Alberta Badlands

                        Comment

                        Working...
                        X