Announcement

Collapse
No announcement yet.

Finally the front clip !!

Collapse
X
 
  • Filter
  • Time
  • Show
Clear All
new posts

  • Finally the front clip !!

    Lost several weeks on the Speedster due to the wife's health issues including a hospital trip aggravated by her MS, but the front clip is finally painted and on.

    Considering that the hood and fenders looked like #6 grit sand paper with normal rust fail points when I started, I'm downright impressed with the outcome. I may re-shoot the hood due to a couple of pin holes next summer but it's time to move on and try to make up some time.

    Click image for larger version

Name:	20131015_205027.jpg
Views:	1
Size:	106.5 KB
ID:	1740903Click image for larger version

Name:	20131015_204904.jpg
Views:	2
Size:	78.5 KB
ID:	1740904Click image for larger version

Name:	20131015_132314.jpg
Views:	2
Size:	82.3 KB
ID:	1740905

    Should look pretty nice when sanded and fine cut.... no that spear isn't attached but it sure looks nice sitting there.

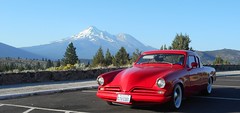
    Picked up those wheels cheap on Craigslist for use as rollers but I'm getting a bit attached to them. The look feels a bit more like the name "Speedster" than the original old man look of the faux wires.

    Time to open up the engine and transmission and see what I've got.
    Last edited by mmagic; 10-17-2013, 05:18 AM.

  • #2
    The two-tone engine compartment looks great, and will highlight the engine, but originally it was all Pimlico Grey wasn't it?

    Comment


    • #3
      I am well aware that the original for an LA car was Pimlico, but I can't stand a drab engine compartment that doesn't highlight the other goodies.

      Comment


      • #4
        I like it. jimmijim
        sigpicAnything worth doing deserves your best shot. Do it right the first time. When you're done you will know it. { I'm just the guy who thinks he knows everything, my buddy is the guy who knows everything.} cheers jimmijim*****SDC***** member

        Comment


        • #5
          Looking great! Hope the wife is doing better. As far as the pinholes go, take some clear, and touch up the pinholes before you color sand and buff. Block sand the touch up smooth with 1500 grit, then buff it out, that will fill the pinholes, and make them less noticeable.

          Jim
          "We can't all be Heroes, Some us just need to stand on the curb and clap as they go by" Will Rogers

          We will provide the curb for you to stand on and clap!


          Indy Honor Flight www.IndyHonorFlight.org

          As of Veterans Day 2017, IHF has flown 2,450 WWII, Korean, and Vietnam Veterans to Washington DC at NO charge! to see
          their Memorials!

          Comment


          • #6
            Thanks 52... I think you gave that tip earlier and I spent an hour yesterday looking for it without success! Will try it.

            Comment


            • #7
              Originally posted by mmagic View Post
              I am well aware that the original for an LA car was Pimlico, but I can't stand a drab engine compartment that doesn't highlight the other goodies.
              That's what I thought. A friend of mine did the same thing to a Seaside Green/Glenbrook Green '56 Golden Hawk!

              Comment


              • #8
                Looking fantastic!

                Comment


                • #9
                  Hope your wife does better. That build is looking great!

                  Comment


                  • #10
                    Very nice! Would you share your process on the "hood and fenders looked like #6 grit sand paper ?" I have similar issues with my Conestoga hood and not being terribly experienced with such things would appreciate suggestions.
                    Pat Dilling
                    Olivehurst, CA
                    Custom '53 Starlight aka STU COOL


                    LS1 Engine Swap Journal: http://www.hotrodders.com/forum/jour...ournalid=33611

                    Comment


                    • #11
                      That's looking pretty sweet!
                      Dave Nevin
                      Corvallis, OR
                      1953 Champion Deluxe Coupe
                      Stud-e-venture blog

                      Comment


                      • #12
                        Originally posted by Pat Dilling View Post
                        Very nice! Would you share your process on the "hood and fenders looked like #6 grit sand paper ?" I have similar issues with my Conestoga hood and not being terribly experienced with such things would appreciate suggestions.
                        Pat.. I'm very amateur, not a pro so my method may not be considered Kosher. When I got the clip a year or two ago, I hit it with a wire cub brush on an angle grinder, wiped it with OSPHO to turn the surface rust to iron phosphate, brushed it with Master Series primer and stacked it outside in the bull pen beside the house.

                        A month ago I brought the pieces in and went over them with 60 grit on a DA to rough up the surface, welded in Classic Enterprises rear fender patches, hood stiffeners and patched places where inner fenders had been hacked up. Fiberglass bondo'd over the inner fender patches and ground and filled rear fender patches. Coated the underside with Rustoleum truck bed liner. I then sealed with Shopline JP375 epoxy primer followed with , 2 coats DPS351 primer surfacer. I blocked this with 220 grit dry and better filled rear fender patches. Two more coats of DPS 351 primer surfacer, ghost coat, blocked with 220 grit filling low spots with catalytic putty. Ghost coated with a different color, blocked with 400 grit again filling any low spots with catalytic putty and sealed with JP375. Filled pin holes with catalytic putty using razor blade for applicator. Applied color and wet sanded nibs with 1000 grit. Applied 3 wet coats of clear. To do: color sand wit 2000 grit and buff with Mcquires fine cut.

                        Between every step washed and wiped with wax and grease remover.

                        Once you apply JP375 you are on the clock. 72 hours to top coat JP375 for good chemical bond, 5 days to top coat DPS 3051, 24 hours to apply clear to base coat. Master Series primer is a single stage urethane used to paint ships and highway bridges with minimal preparation so the OSPHO could have been skipped. Likewise if I hadn't brushed the Master Series on and if I didn't need to use it for filler by sanding off the high points even if to steel the epoxy sealer might have been skipped. The sealer coat was really needed as there were a few places that sanding had gone to steel.

                        Comment


                        • #13
                          Mounting the front clip, particularly if it came a different vehicle and/or rear fender patches are welded in is not unlike flying a small airplane. When flying an airplane you are dealing simultaneously with multiple dynamics... left/right, up/down, climb/decline, speed and all are interdependent.

                          When mounting fenders the simultaneous dynamics are door clearance, spacing from door, relationship to other clip parts, alignment to frame etc. When replacing the fenders don't fail to replace the rubber spacer/pad between the fender "L" channel and the A pillar. They can be purchased from SI or fabricate them yourself. In addition to a set from SI I cut several more from 3/16" thick rubber sheets used to protect newsprint rolls from box car floors. I then stacked them as needed to get the right thickness.

                          Comment


                          • #14
                            Thanks for the details. Hope mine can come out close to as nice.
                            Pat Dilling
                            Olivehurst, CA
                            Custom '53 Starlight aka STU COOL


                            LS1 Engine Swap Journal: http://www.hotrodders.com/forum/jour...ournalid=33611

                            Comment


                            • #15
                              That car is way too pretty to wear those wheels. {Just my worthless opinion} Hope your wife is feeling better!!

                              Comment

                              Working...
                              X