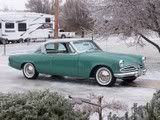
Purists beware: my Lark is a mild custom, so some things are "different".
So last year, I found some late model Mustang wheels that I like for a good price with great tires. I had some immediate issues; namely, that the offset was not meant for Studebakers - the wheel hit the steering arm. This spring, I solved that with 1" wheel spacers all around. Now this car won't be driven "much", so I don't anticipate much of an issue with added load on the bearings.
With that problem solved, I still had the issue of "FORD" being smack in the middle of the wheel caps. That just wouldn't do for me. So I spent much of the winter thinking of a solution. I knew I wanted a Stude logo in the center, but how to get it there? The Ford caps were not smooth, so do I fill the Ford oval and smooth it or find some Stude discs and glue them on? Well, I decided to make my own. Here are the results:
Step 1: winters are long in Michigan, so I had plenty of time to thing about circles and domes. I realized that a ball might provide little circles that would actually be domes. I found a website that would allow me to experiment with ball diameters to produce a 2.25" diameter dome with about a 1/4" height. I would need a 5" ball. I went to the local crafts store and all they had was a 100mm (4") diameter plastic ornament that came in two halves. I got out my compass and scribed 2.25" diameter circles on the surface.

Step 2: I got out my Dremel and a cutoff wheel and cut around the scribe lines and then used the face of the wheel to smooth out the rough edges and create the circle. I also flattened the bottom with the Dremel and rough sandpaper on a flat surface (the back side would be where to adhere it to the spinner).

Step 3: I had decided on what logo I would use, so the next step was paint prep. I sprayed "chrome" paint on the discs. I also knocked down the high spots with 100 grit paper in between coats.

Step 4: Next was to mask off the silver and spray with black.

Step 5: Here are the pieces in various stages of assembly.

Step 6: And the dome glued to the spinner. I used RTV silicone. It is simple, sticks to just about everything, and will allow removal if necessary.

Step 7. Here is the first spinner on the first wheel.

Step 8. This shot shows the nice arc on the dome. I had wanted a 5" diameter ball, but the 4" diameter has produced a very nice curve. I am very happy with the results!

Again, I'm happy with the way this turned out. I know some are going to think "WHAT?!?!? an Avanti logo on a Lark??? SACRILEGE!!!" But that's what MY money bought me for MY car My car won't be stock, but it could be returned to stock with little work.
--george
1963 Lark Daytona HT - 63V J8 175
53-54 C/Ks, 55 Speedsters, 63 Daytonas, Wagonaires Registries

So last year, I found some late model Mustang wheels that I like for a good price with great tires. I had some immediate issues; namely, that the offset was not meant for Studebakers - the wheel hit the steering arm. This spring, I solved that with 1" wheel spacers all around. Now this car won't be driven "much", so I don't anticipate much of an issue with added load on the bearings.
With that problem solved, I still had the issue of "FORD" being smack in the middle of the wheel caps. That just wouldn't do for me. So I spent much of the winter thinking of a solution. I knew I wanted a Stude logo in the center, but how to get it there? The Ford caps were not smooth, so do I fill the Ford oval and smooth it or find some Stude discs and glue them on? Well, I decided to make my own. Here are the results:
Step 1: winters are long in Michigan, so I had plenty of time to thing about circles and domes. I realized that a ball might provide little circles that would actually be domes. I found a website that would allow me to experiment with ball diameters to produce a 2.25" diameter dome with about a 1/4" height. I would need a 5" ball. I went to the local crafts store and all they had was a 100mm (4") diameter plastic ornament that came in two halves. I got out my compass and scribed 2.25" diameter circles on the surface.
Step 2: I got out my Dremel and a cutoff wheel and cut around the scribe lines and then used the face of the wheel to smooth out the rough edges and create the circle. I also flattened the bottom with the Dremel and rough sandpaper on a flat surface (the back side would be where to adhere it to the spinner).
Step 3: I had decided on what logo I would use, so the next step was paint prep. I sprayed "chrome" paint on the discs. I also knocked down the high spots with 100 grit paper in between coats.
Step 4: Next was to mask off the silver and spray with black.
Step 5: Here are the pieces in various stages of assembly.
Step 6: And the dome glued to the spinner. I used RTV silicone. It is simple, sticks to just about everything, and will allow removal if necessary.
Step 7. Here is the first spinner on the first wheel.
Step 8. This shot shows the nice arc on the dome. I had wanted a 5" diameter ball, but the 4" diameter has produced a very nice curve. I am very happy with the results!
Again, I'm happy with the way this turned out. I know some are going to think "WHAT?!?!? an Avanti logo on a Lark??? SACRILEGE!!!" But that's what MY money bought me for MY car
My car won't be stock, but it could be returned to stock with little work.--george
1963 Lark Daytona HT - 63V J8 175
53-54 C/Ks, 55 Speedsters, 63 Daytonas, Wagonaires Registries


 ]
]
 ]
]


Comment