Announcement

Collapse
No announcement yet.

The way of my President

Collapse
X
 
  • Filter
  • Time
  • Show
Clear All
new posts

  • Other: The way of my President

    Hello!
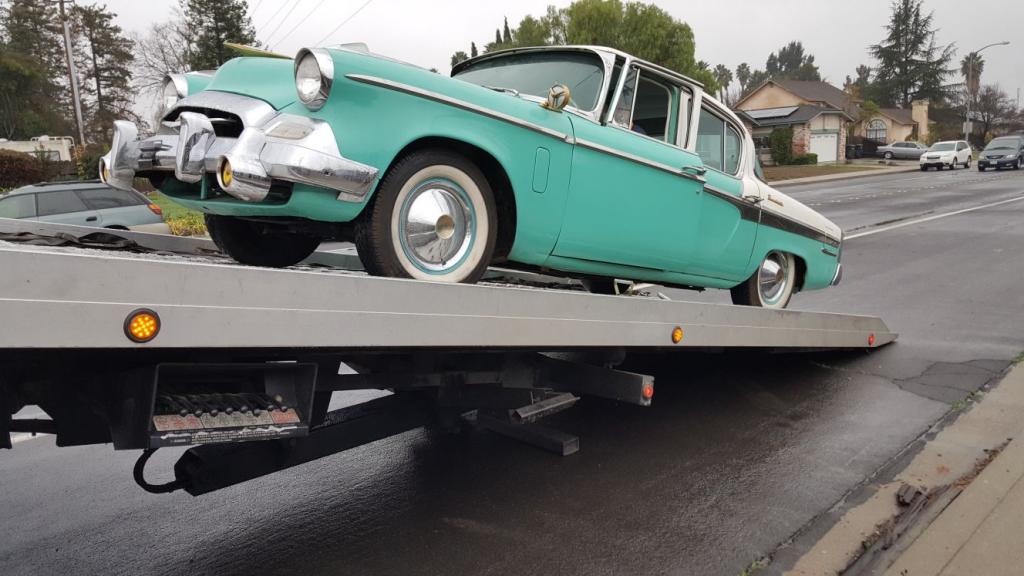
    In this post, I'd like to share with you the progress made by my 1955 Studebaker President.
    I bought it from near San Francisco and imported it to Germany.
    Click image for larger version

Name:	IMG-20180110-WA0001.jpg
Views:	1
Size:	83.2 KB
ID:	1758213 Click image for larger version

Name:	00A0A_jblpr2ZbYRw_1200x900.jpg
Views:	3
Size:	71.2 KB
ID:	1758214

    To make him streetlegal in Germany, a few more works are necessary.
    I have to change the headlights, hazard warning lights are also mandatory.
    In addition, a few other parts have to be replaced.

    I started with the hazard warning lights and the headlights. Fortunately, one of the previous owners had already modernized the electrical system, so I did not have to install a new wiring harness.

    Next, I blasted the underside with dry ice. I found an absolutely rustfree underbody.

    Click image for larger version

Name:	20180510_121859.jpg
Views:	1
Size:	83.1 KB
ID:	1758216 Click image for larger version

Name:	20180510_123859.jpg
Views:	1
Size:	78.5 KB
ID:	1758217 Click image for larger version

Name:	20180510_192127.jpg
Views:	2
Size:	58.7 KB
ID:	1758218 Click image for larger version

Name:	20180510_192219.jpg
Views:	1
Size:	70.4 KB
ID:	1758219

    Next I changed the rear shocks, the rear stabilizer rubber mounts and the leaf springs.

    Click image for larger version

Name:	20180624_141830.jpg
Views:	1
Size:	85.5 KB
ID:	1758220 Click image for larger version

Name:	20180624_141905.jpg
Views:	1
Size:	72.0 KB
ID:	1758222
    Attached Files

  • #2
    At the moment I replace the front shocks, the rubber bearings of the stabilizer, the springs and the bearings of the lower control arm.

    Click image for larger version

Name:	20180710_190612.jpg
Views:	1
Size:	71.6 KB
ID:	1721398 Click image for larger version

Name:	20180714_103613.jpg
Views:	1
Size:	84.3 KB
ID:	1721399 Click image for larger version

Name:	20180714_103638.jpg
Views:	1
Size:	70.2 KB
ID:	1721400 Click image for larger version

Name:	20180714_114415.jpg
Views:	1
Size:	75.3 KB
ID:	1721401

    I just have sandblasted the lower control arm and applied the first layer of corrosion preventing paint

    Click image for larger version

Name:	20180714_121614.jpg
Views:	1
Size:	115.8 KB
ID:	1721402 Click image for larger version

Name:	20180714_144417.jpg
Views:	1
Size:	80.0 KB
ID:	1721403 Click image for larger version

Name:	20180714_153817.jpg
Views:	1
Size:	53.4 KB
ID:	1721404

    The old and the new front spring

    Click image for larger version

Name:	20180715_135917.jpg
Views:	1
Size:	107.7 KB
ID:	1721405

    For some reason I don't understand a rubber damper has been installed in the driver side spring

    Click image for larger version

Name:	20180715_135926.jpg
Views:	1
Size:	113.1 KB
ID:	1721406

    Comment


    • #3
      Explain the dry ice blasting. I've never heard of that.

      Comment


      • #4
        clean as a whistle. cheers jimmijim
        sigpicAnything worth doing deserves your best shot. Do it right the first time. When you're done you will know it. { I'm just the guy who thinks he knows everything, my buddy is the guy who knows everything.} cheers jimmijim*****SDC***** member

        Comment


        • #5
          Originally posted by 5brown1 View Post
          Explain the dry ice blasting. I've never heard of that.
          Here is a film about:


          It is like sand blasting. The difference is you only removed dirt. But you can use it not only on metal surfaces. It works also on plastic, glass, rubber. So you can clean the complete underbody. You can also clean the engine area very easily.

          Comment


          • #6
            The rubber damper was a cheap way of getting a little more use out of worn out springs.

            Comment


            • #7
              Originally posted by 70Avanti2 View Post
              The rubber damper was a cheap way of getting a little more use out of worn out springs.
              Ok, as i thought.
              Thanks for the information

              Comment


              • #8
                Martin, I just watched the video you posted and then looked up dry ice blasting in Portland, Oregon. It turns out there is an outfit here called Portland Blasting that uses this method. I am intrigued by this and will get more information. I guess it has been around but this is the first I have heard of it. Thanks for dropping that one on us. Very informative.
                B-T-W, I love your car. Here is mine. Click image for larger version

Name:	DSCN3665.jpg
Views:	1
Size:	119.7 KB
ID:	1721410
                Last edited by Commander Eddie; 07-16-2018, 12:05 PM.
                Ed Sallia
                Dundee, OR

                Sol Lucet Omnibus

                Comment


                • #9
                  Originally posted by Commander Eddie View Post
                  Martin, I just watched the video you posted and then looked up dry ice blasting in Portland, Oregon. It turns out there is an outfit here called Portland Blasting that uses this method. I am intrigued by this and will get more information. I guess it has been around but this is the first I have heard of it. Thanks for dropping that one on us. Very informative.
                  B-T-W, I love your car. Here is mine. [ATTACH=CONFIG]73884[/ATTACH]
                  Nice car

                  Yes, dry ice blasting is common here in Germany, espacially in the classic car scene. I know it since a couple of years.
                  Here are several companies, which offer ice blasting. Some of them are mobil and do the work at your home. When I do the work, I used approx. 250-275kg (550-600lbs) of ice pellets and 2 days. I have rent all the equipment like a very large compressor, the blasting machine and 700kg (1500lbs) ice pellets for four days and have paid 800€ ($930).

                  Comment


                  • #10
                    I have done dry ice blasting and it is a very unique process. It only removes dirt and grime. It is often used to clean up after a fire. The dry ice is the abrasive and it hardens what it hits due to the coldness and removes it. Thin tar can be removed because it freezes the tar and breaks it off leaving a clean surface. It will not remove old body filler, paint or rust. When done, the only clean-up is to sweep up the blasted off material. The dry ice evaporates so there is no moisture to make a mess.
                    sigpic1966 Daytona (The First One)
                    1950 Champion Convertible
                    1950 Champion 4Dr
                    1955 President 2 Dr Hardtop
                    1957 Thunderbird

                    Comment


                    • #11
                      Front suspension done.
                      New shocks and springs installed, also the rubber parts of stabiler replaced. New bushings of the lower control arm installed.
                      Click image for larger version

Name:	20180719_103203.jpg
Views:	1
Size:	75.9 KB
ID:	1721433 Click image for larger version

Name:	20180718_112916.jpg
Views:	1
Size:	52.8 KB
ID:	1721434

                      Comment


                      • #12
                        Nice work. Did you have any difficulty installing the front coil springs? I have new ones for my car and am just curious how big a job this will be.
                        Ed Sallia
                        Dundee, OR

                        Sol Lucet Omnibus

                        Comment


                        • #13
                          Originally posted by Commander Eddie View Post
                          Nice work. Did you have any difficulty installing the front coil springs? I have new ones for my car and am just curious how big a job this will be.
                          It's not that big deal.
                          You have to remove the shock and lower the lower control arm.
                          For installation you need 2 jacks. One to lift the control arm (inside), the second to give a upwards force to the lower control arm (outside). Otherwise it is very difficult to align the bolt holes of the rod.
                          In the best case you do the job with two persons
                          Last edited by gsx_martin; 07-19-2018, 01:03 PM.

                          Comment


                          • #14
                            Nice work, Martin; congrats. Also thanks for the information on dry ice blasting. 'Hadn't heard of it. BP
                            We've got to quit saying, "How stupid can you be?" Too many people are taking it as a challenge.

                            G. K. Chesterton: This triangle of truisms, of father, mother, and child, cannot be destroyed; it can only destroy those civilizations which disregard it.

                            Comment


                            • #15
                              Originally posted by gsx_martin View Post
                              At the moment I replace the front shocks, the rubber bearings of the stabilizer, the springs and the bearings of the lower control arm.

                              [ATTACH=CONFIG]73864[/ATTACH] [ATTACH=CONFIG]73865[/ATTACH] [ATTACH=CONFIG]73866[/ATTACH] [ATTACH=CONFIG]73867[/ATTACH]

                              I just have sandblasted the lower control arm and applied the first layer of corrosion preventing paint

                              [ATTACH=CONFIG]73868[/ATTACH] [ATTACH=CONFIG]73869[/ATTACH] [ATTACH=CONFIG]73870[/ATTACH]

                              The old and the new front spring

                              [ATTACH=CONFIG]73871[/ATTACH]

                              For some reason I don't understand a rubber damper has been installed in the driver side spring

                              [ATTACH=CONFIG]73872[/ATTACH]
                              It's not a damper. It's a spreader used when the coil springs begin to sag. It was the cheap way out rather than replacing the springs to ge the ride height back to where ist was supposed to be.

                              Comment

                              Working...
                              X