A while back I asked about replacing the upper seal on my 74 Avanti steering box. Adam DeRosa answered with a link to his solution on Bob's website. He used SKF seal 8625. The link http://www.studebaker-info.org/tech/...sstopseal.html
Adam used a Dremel tool to open the housing, I'm lucky enough to have a lathe so I machined the housing for a press fit and set the seal about 1/8" lower in the housing to assure the seal was running on a non-worn portion of the shaft.
[IMG]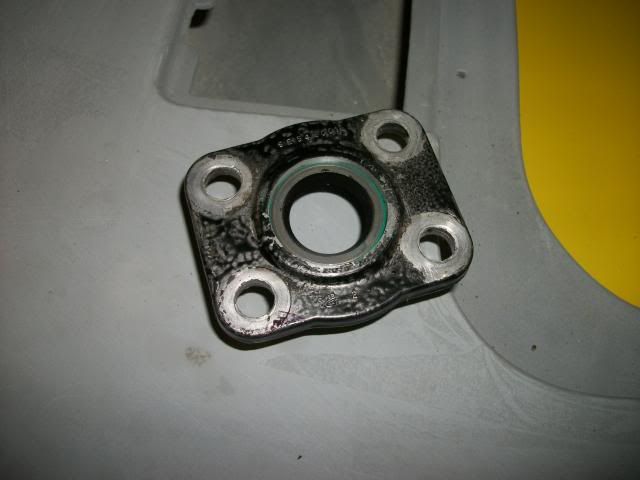 [/IMG]
Thanks Adam, you saved me a ton of research and no leaks either.
My rag joint - steering coupler has seen better days so I went to the search function here and Bob's site and got the part numbers listed. Well!! as is wont to happen, NAPA and the Internet couldn't come up with a currently available interchange as those numbers were quite old.
Measuring the shaft yielded a 3/4" X 36 tooth measurement and found that size/spline was not all that common. Some were available but there were flat spots on the couplers toothed radius. Finally found this one at Speedway which fit. http://www.speedwaymotors.com/GM-Sty...int,41916.html It's made buy Classic Products P/N RJC-736R
In real life it looks like this.
[IMG]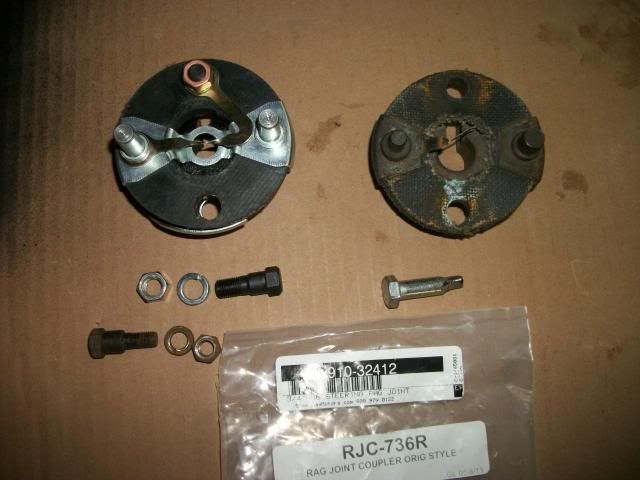 [/IMG]
I posted this shot because there of two adaptations necessary. There are two shoulder bolts under the new joint. The newer one from the new coupler is 3/8" whereas the older one is 5/16". The shoulders are the same size so replace the 3/8" with one 5/16" from the old coupler. The old coupler had two 5/16" bolts whereas the new one had one 3/8" and one 5/16" shoulder bolts. The pins are both 3/8" on the new one and 5/16" and 3/8" on the old but it makes no difference for the installation.
The cutoff bolt under the old coupler has a slight oval ground on the end. The coupling was a tight fit so I just put the bolt in the gap and turned it to open coupling a few thousands. Slid on like butter.
Installed.
[IMG]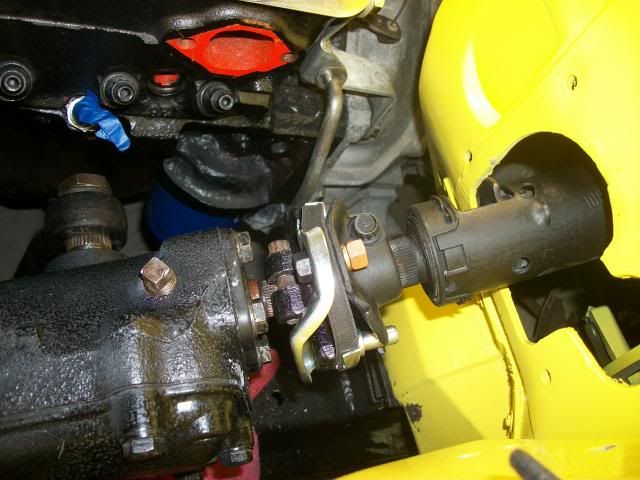 [/IMG]
It's the little things like this that need doing (And Golf) that's just slows down the painting. But we're close.
Bob
Adam used a Dremel tool to open the housing, I'm lucky enough to have a lathe so I machined the housing for a press fit and set the seal about 1/8" lower in the housing to assure the seal was running on a non-worn portion of the shaft.
[IMG]
 [/IMG]
Thanks Adam, you saved me a ton of research and no leaks either.
My rag joint - steering coupler has seen better days so I went to the search function here and Bob's site and got the part numbers listed. Well!! as is wont to happen, NAPA and the Internet couldn't come up with a currently available interchange as those numbers were quite old.
Measuring the shaft yielded a 3/4" X 36 tooth measurement and found that size/spline was not all that common. Some were available but there were flat spots on the couplers toothed radius. Finally found this one at Speedway which fit. http://www.speedwaymotors.com/GM-Sty...int,41916.html It's made buy Classic Products P/N RJC-736R
In real life it looks like this.
[IMG]
 [/IMG]
I posted this shot because there of two adaptations necessary. There are two shoulder bolts under the new joint. The newer one from the new coupler is 3/8" whereas the older one is 5/16". The shoulders are the same size so replace the 3/8" with one 5/16" from the old coupler. The old coupler had two 5/16" bolts whereas the new one had one 3/8" and one 5/16" shoulder bolts. The pins are both 3/8" on the new one and 5/16" and 3/8" on the old but it makes no difference for the installation.
The cutoff bolt under the old coupler has a slight oval ground on the end. The coupling was a tight fit so I just put the bolt in the gap and turned it to open coupling a few thousands. Slid on like butter.
Installed.
[IMG]
 [/IMG]
It's the little things like this that need doing (And Golf) that's just slows down the painting. But we're close.
Bob