Announcement

Collapse
No announcement yet.

56 Goldenhawk restoration LS1 update ....among other things

Collapse
X
 
  • Filter
  • Time
  • Show
Clear All
new posts

  • 56 Goldenhawk restoration LS1 update ....among other things

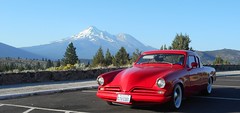
    We are now just getting back to business on our 56J. The LS1 with 4L60E was installed late fall (first photo). Installed a set of swept back jet hot coat Sandersen headers. Installed laser cut aluminum brackets for AC compressor, power steering pump and alternator. Used Slick Street Stuff's hanging brake pedal with brake booster and dual master cylinder.....better access than an under floor set up. With a minimum amount of fabrication and recalculation we replaced the non power rack that came with the Slick Street Stuff IFS using a GM GenII remote pump for the new power unit. Fuel tank installed with feed and return lines thru a high pressure exterior mounted pump. New brake lines....front discs and rear drums and a lokar Ebrake set up completes the mechanicals. Will post the rest of the mechanicals and electronics next time.
    Attached Files

  • #2
    Very nice! Great to see progress. Did you re-enforce the firewall? Or did the kit from SSS have something to do that?
    Pat Dilling
    Olivehurst, CA
    Custom '53 Starlight aka STU COOL


    LS1 Engine Swap Journal: http://www.hotrodders.com/forum/jour...ournalid=33611

    Comment


    • #3
      Excellent progress Super Mike, I'm getting my 53 back on track...slow as it is...and could use some inspiration.

      Bill
      Bill Foy
      1000 Islands, Ontario
      1953 Starlight Coupe

      Comment


      • #4
        wow, nice work....going to be a awesome road car. junior
        sigpic
        1954 C5 Hamilton car.

        Comment


        • #5
          Originally posted by Pat Dilling View Post
          Very nice! Great to see progress. Did you re-enforce the firewall? Or did the kit from SSS have something to do that?
          Couple of things. Thanks to one an all on the positive comments...... have Kent Stauffer to thank for the workmanship on this piece, along with Good ole Allen Barth, way out there in Davenport Washington. Wanting Allen to see we have taken notice of the level of expertise he applies to each of his projects, be it the 56J he is finishing up for a friend, Ed Kahn or another project for another friend Roy Pearson and his 1930 Packard Convertible Coupe, Allen is retrofitting back to its glory by incorporating all mechanical technologies affforded us these days....or my 31 Auburn Brougham....the ACD boys accuse us of destroying??? Guess it bothers them that Allen...not me ...is tearing apart one of 6 remaining cars of that year and updating motor/trans/suspension etc. Shame on you Allen !!! Can only imgine what they are saying about the guy paying him to do so !!

          Ok... back to you Pat. Plan was to wait a bit to post more shots but will waive that for you and show you the answer to your question ...and a bit more. Attached photos ahow all the holes Kent plugged and brackets for the hanging brake pedal....the under dash E-brake install ..... the electric box along with the evporator for the heat/air/defrost by Vintage Air. All the goodies are accounted for....except for the power windows unit. Relic makes one that fits the Studebaker stock door brackets. Makes it easy. Then we will use the original crank to operate it up and down !

          We should be ready to re assemble in the next two weeks.....paint in the next 6 weeks....and what I am looking forward to ....interior creation and install. I sold John Miller, Miller Upholstery a 53 coupe and his plan is to do his and mine together......using a GT Dash in mine and 4 bucket seats with center console from dash to rear glass in both cars. Should be interesting.
          Attached Files
          Last edited by mike super; 03-07-2013, 08:55 AM.

          Comment


          • #6
            Very nice workmanship, thanks for showing the "guts" underneath. I am curious about the fuse panel placement, how do you plan to access it once the dash is in place? I mounted mine on a flip down panel so it is out of the way except when I need to access it.
            Pat Dilling
            Olivehurst, CA
            Custom '53 Starlight aka STU COOL


            LS1 Engine Swap Journal: http://www.hotrodders.com/forum/jour...ournalid=33611

            Comment


            • #7
              Originally posted by Pat Dilling View Post
              Very nice workmanship, thanks for showing the "guts" underneath. I am curious about the fuse panel placement, how do you plan to access it once the dash is in place? I mounted mine on a flip down panel so it is out of the way except when I need to access it.
              Send me a picture or post it here please and describe how you did so Pat. See...we have not thought of everything !! Any and all input/suggestions is very much appreciated.
              thanks...mike

              Comment


              • #8
                That is super nice. cheers jimmijim
                sigpicAnything worth doing deserves your best shot. Do it right the first time. When you're done you will know it. { I'm just the guy who thinks he knows everything, my buddy is the guy who knows everything.} cheers jimmijim*****SDC***** member

                Comment


                • #9
                  That is a good idea for the fuse panel Pat, I plan to use lower vanity panels, right side fixed and now I think the left side will be hinged. My list of stolen 'ideas' continues to grow....who needs an original thought.

                  Could it be time to have a 'modified' section on the forum just for this kind of information?


                  Wait, I think I read that somewhere before.


                  Keep the pictures flowing, Mike

                  Bill
                  Bill Foy
                  1000 Islands, Ontario
                  1953 Starlight Coupe

                  Comment


                  • #10
                    Some very nice work accomplished here.

                    Also can not go wrong with ideas from Pat.
                    sigpic 1963 Studebaker Avanti: LS1 motor and T-56 transmission have been moved rearward, set up as a two seat coupe with independent rear suspension. Complex solutions for nonexistant problems.

                    Comment


                    • #11
                      That looks like a Vintage air unit. I am to install a vintage air unit in a 56 J and I'm not sure which unit to get. Beautiful work!!
                      Jamie McLeod
                      Hope Mills, NC

                      1963 Lark "Ugly Betty"
                      1958 Commander "Christine"
                      1964 Wagonaire "Louise"
                      1955 Commander Sedan
                      1964 Champ
                      1960 Lark

                      Comment


                      • #12
                        Originally posted by starliner62 View Post
                        That looks like a Vintage air unit. I am to install a vintage air unit in a 56 J and I'm not sure which unit to get. Beautiful work!!
                        It is a Gen III heat/air/defrost unit

                        Comment


                        • #13
                          I think you can't find a better setup for power with fuel ecomony. Thanks for sharing. You should get a lot of enjoyment showing and driving your setup!
                          Randy Wilkin
                          1946 M5 Streetrod
                          Hillsboro,Ohio 45133

                          Comment


                          • #14
                            Here is a link to my "Rewire Project" that I undertook not too long after getting this car. It would have been nice to be able to do a good clean wiring set up as the car was built, but I inherited the work of a couple people in front of me. I made further improvements when I did the LS1 swap later on. If you start from this picture and scroll forward you will get an idea of how I mounted the fuse panel. There are brief descriptions under the pictures. One caution I will offer, the way my fuse panel is mounted you do have to be careful if you have big feet. Fortunately I do not. Feel free to ask more questions. http://www.flickr.com/photos/9729183...7600676596432/

                            Thanks for the kind comments.
                            Last edited by Pat Dilling; 03-07-2013, 08:15 PM.
                            Pat Dilling
                            Olivehurst, CA
                            Custom '53 Starlight aka STU COOL


                            LS1 Engine Swap Journal: http://www.hotrodders.com/forum/jour...ournalid=33611

                            Comment


                            • #15
                              Kent installed the original fuel tank yesterday, adapting the high pressure pump in and out lines from the tank to the motor along the frame rail with filter. Pump installed close to the tank and shielded from the heat off the exhaust pipes. Passenger side frame rail has trans cooler tucked in and accessable in the future. All brake lines now installed to include Lokar E-Brake to rear drums. We are installing remaining sound deadening material as we did while we had the car body itself on the rotisserie a few months back applying it to the roof. You tap a spot with and one without and there is a big difference in reverberated sound at the location. Well worth the expendature. Last but not least is the substitution and installation of the GT dash. I will be reconstructed to butt to a center console that will run from it to the rear windshield with 4 bucket seats molded in to complete the interior. Plan now is use of Classic Instrument Nickel gauge group and a period Banjo 17 inch steering wheel.

                              Last posting till reassembly....
                              Attached Files

                              Comment

                              Working...
                              X