Announcement

Collapse
No announcement yet.

74 Avanti hog trough - roll bar bolt removal

Collapse
X
 
  • Filter
  • Time
  • Show
Clear All
new posts

  • Body / Glass: 74 Avanti hog trough - roll bar bolt removal

    I've reviewed both Bob Johnstone's and Dick Steinkamp's site on hog trough removal and installation and found varying ways to remove the bolts that secure the roll bar to the hog troughs.

    Not a lot of pictures and one suggested I would need to cut into the body exterior so I looked at my 74 and this is what I did.

    I removed the seat belts and rear arm rest. I found no access to the area, so after some looking I decided on this route.

    I'll start with a shot of the tools I used to access the area.


    Enlarge the area that the rear seat belt rests in to get access to the glass area that covers the bolts. This allows the 90 deg drill with a holesaw to reach the area over the bolts. This shot shows the the area in the fiberglass opened up and you can just see one of the bolt heads.

    It took two cutouts with the 2 1/2" whole saw and a clean up with the long shaft die cutter to get the area open.


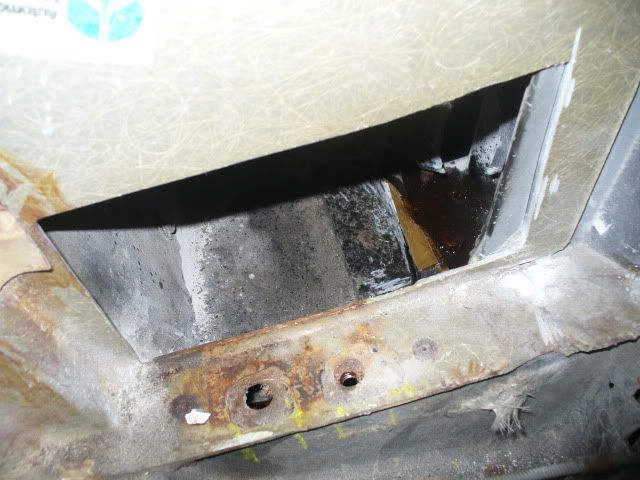
    This is a closer shot of one of the bolts soaking in rust penetrate.


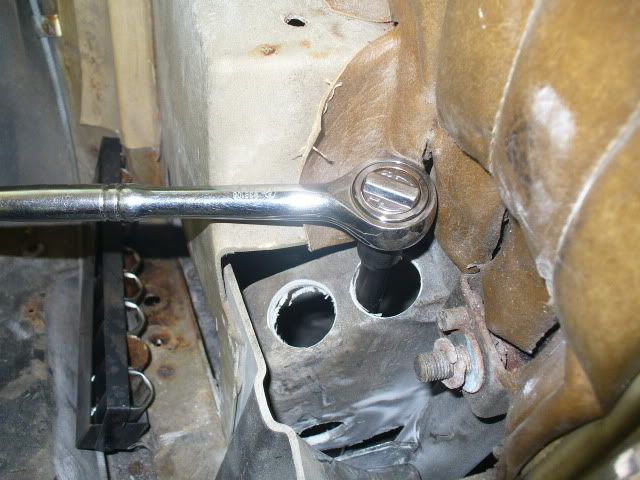
    I then drilled two smaller holes in the arm rest support to access the bolts with a 1/2" deep socket and extension and removed the bolts.


    It looks like I'll be able to easily repair the area and put it back together with out anything showing.

    Hope this helps someone in the future.

    Bob

  • #2
    Bob,

    I know it's 12 years since you posted this topic, but at the end of your post, you wished that it would help someone in the future. Well, it sure is helping me as I work through hog trough removal and replacement on my '64 Avanti. I like your method as it avoids cutting a perfectly good exterior body panel to access the bolts. I've been studying your photos and trying to understand what I'm seeing. I took my laptop into the garage and compared the photos to the left rear arm rest area of my Avanti and I think I understand now. One question I have is this: it looks to me like the large square hole you cut in the side of the armrest support (your 2nd picture) would be unnecessary for me or anyone else today. For you it might have been exploratory, but in that you did the exploring, maybe I don't have to. Couldn't I just cut the two smaller circular holes to get to the bolt heads with a socket and extension? I realize that in order to cut the two smaller holes, I will still have to remove a small area of fiberglass behind the ashtray opening. Done this way, only minor fiberglass repair would be necessary. Does this seem reasonable to you?

    Also, were you able to avoid cutting the exterior body panel behind the front wheel to get to the hidden rivets?

    Thanks for the help, then and now,
    Pete
    Pete R
    Woodbridge, VA
    1954 Studebaker Commander Regal Starlight Coupe with '62 289 and 4-speed
    1964 Studebaker Avanti R5083 R2 4-speed with 4.09:1 Twin Traction

    Comment


    • #3
      Pete, My mind is pretty vague about the pop rivets so no help there. I'm also not much help on what to cut out so I'd just try to do the job without it first. Sorry I can't be more help.

      Bob

      Comment


      • #4
        Thanks anyway, Bob. I will try going straight to the roll bar bolts with a cut behind the ashtray opening. I'll report back on how that works out. On the two front hidden rivets, I'll have to explore that one.

        Regards,

        Pete
        Pete R
        Woodbridge, VA
        1954 Studebaker Commander Regal Starlight Coupe with '62 289 and 4-speed
        1964 Studebaker Avanti R5083 R2 4-speed with 4.09:1 Twin Traction

        Comment


        • #5
          Interested in how it works out. keep me in the loop. Bob

          Comment


          • #6
            How do you remove the rear armrest? I only see two screws in the very front.

            Comment


            • #7
              You can access the front trough rivets by removing a section of the inner kick panel and then re-attaching it with bonding strips. Also a small hole is necessary at the front of the door jamb to remove a rivet. I should have pictures of the cut locations but they are Polaroid. I'll see what I can do to copy them.

              Comment


              • #8
                Here's what I got in pictures - they were not Polaroid but color film, so I took digital photos of them, so not the best but should give you an idea a what has to be done.
                Click image for larger version  Name:	IMG_1401.jpg Views:	44 Size:	22.0 KB ID:	1983794 Click image for larger version  Name:	IMG_1404.jpg Views:	46 Size:	24.9 KB ID:	1983795 Click image for larger version  Name:	IMG_1402.jpg Views:	45 Size:	28.3 KB ID:	1983800 Click image for larger version  Name:	IMG_1403.jpg Views:	45 Size:	21.4 KB ID:	1983796
                The first 2 show the location of the front rivet requiring a small hole at the leading edge of the sill. Te 3rd picture shows the section removed to access the other front rivets and the last picture shows the pieces removed including the rear arm rest one and the section of outer body behind the rear of the door opening at the bottom. That last piece may be necessary if you run into excessive rusting, as I did.
                Attached Files
                Last edited by WCP; 04-04-2023, 06:35 AM.

                Comment


                • #9
                  Originally posted by paul shuffleburg View Post
                  How do you remove the rear armrest? I only see two screws in the very front.
                  Ditto to that question, please.

                  Comment


                  • #10
                    You don't. The arm rest is part of the Avanti body. You remove a section of the panel that the rear seat frame contacts. The large grey piece in the last picture of post number 8 is what is removed. Both front and rear insde panels and covering must be removed to access the fiberglass sections that are removed.
                    Last edited by WCP; 04-04-2023, 01:52 PM.

                    Comment


                    • #11
                      Thanks to all the great advice and experience shared here on the SDC Forum, today I was able to remove both roll bar bolts from the inside of the car without cutting the exterior body panel. Next challenge will be to get to the two hidden rivets at the front through the kick panel, as explained by WCP. I'm taking plenty of pictures and plan to write up the procedure in illustrated how-to format, maybe for an article in Turning Wheels and/or the Avanti newsletter. Meanwhile, I'll keep you posted on further progress.
                      Pete R
                      Woodbridge, VA
                      1954 Studebaker Commander Regal Starlight Coupe with '62 289 and 4-speed
                      1964 Studebaker Avanti R5083 R2 4-speed with 4.09:1 Twin Traction

                      Comment


                      • #12
                        Note that some of the inner kick panel cut lines are dual layers. Don't cut thru both layers. As I recall, I cut along the scribe lines with the sharp edge of a broken piece of a fine tooth hacksaw blade. Keep vacuuming the cut line until you see the bonding material and then break the bond with a hand chisel or air chisel. Ditto at the toe board and floor board. This way gives you an overlap sections on 3 sides for re-bonding. Add a bonding strip to the backside of the upper horizontal cut.

                        Comment


                        • #13
                          WCP, I see what you mean about the double layers in the kick panel. Thank you for that.

                          Another question: As previously discussed, I removed the two roll bar bolts that are inboard of the roll bar by cutting through the arm rest, using the hole saw to cut access holes above the bolts, and then cutting behind the ash tray in order to use a socket wrench and long extension to remove the bolts from directly above them. BUT, after these two bolts were out, the rear end of the hog trough would not come out. Something seemed to be holding it in. Looking at the new hog trough, I saw two holes in the outer flange, outboard of the two captive nuts for the roll bar bolts that I removed. I wondered what those two holes were for--they were bigger than rivet holes. So I took another look in the car where I removed the two bolts. Outboard of where the outer bolt was, I could feel a pointed, threaded stud--but no head or nut. Is this an upside down bolt? Is the roll bar anchored to the hog trough through these other two holes in the hog trough? If so, then there are a total of 4 roll bar bolts on each side of the car. (I thought there were only 2 on each side.) If what I'm feeling is a bolt, then it looks like it (and one other hidden bolt) thread through the hog trough outer flange and into the roll bar base (which I guess is thick enough to be threaded) in an area that is only accessible by cutting through the rocker panel from outside, just behind the door opening. So now I'm starting to think that cutting at least a small hole in the outer body panel is unavoidable after all, unless you are installing a multi-piece Classic Enterprise hog trough, in which case you leave the outer flange of the old hog trough in place and, therefore, don't need to remove these two extra bolts. Please comment.

                          Thanks,
                          Pete
                          Last edited by Pete R; 04-16-2023, 03:33 PM.
                          Pete R
                          Woodbridge, VA
                          1954 Studebaker Commander Regal Starlight Coupe with '62 289 and 4-speed
                          1964 Studebaker Avanti R5083 R2 4-speed with 4.09:1 Twin Traction

                          Comment


                          • #14
                            I think you are correct as far as I can remember. I did remove the small section as seen at the most right in the picture of the removed pieces (bluish one). Are you replacing the hog troughs with new ones or planning on rebuilding them? Cut a hole or section of the bottom of the trough to access those bolt head or as a last reort, remove that small section of the outer body skin. It is low enough that it can be easily replaced with small bonding strips and careful sanding and paint blending as compared to the front outside panel.

                            Comment


                            • #15
                              I am currently undertaking the removal of the remains (not much remaining!) right hand Torque Box in my '81. I am up to the removal of the two bolts pointing downward at the base of the Rollover bar.
                              I'm finding this thread mighty interesting so far. I have 'Classic Enterprises' SS troughs to install.
                              The instructions in the Steinkamp Blog point to drilling these two out and re- tapping the holes at the bulkhead (a bigger size, I believe). No mention of any other bolts was mentioned in the Blog. Keep the photos coming Click image for larger version

Name:	10. 19Mar23 RH Hogtrough remains. Detail of Rollover Bar Bulkhead and bolt ends. Looking forward to front end.jpg
Views:	145
Size:	95.5 KB
ID:	1985643 .
                              Last edited by Steve Winzar; 04-16-2023, 05:30 PM.

                              Comment

                              Working...
                              X