Announcement

Collapse
No announcement yet.

Body off frame

Collapse
X
 
  • Filter
  • Time
  • Show
Clear All
new posts

  • Body off frame

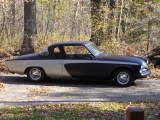
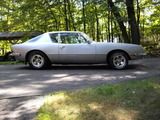
    I recently acquired a 55 commander..A few areas of rust but not to bad,I have completly taken the car apart.Fenders ,doors nhood etc.I have removed the eng and tranny.Interior of car stripped dash ,headliner etc.The wiring harness removed.I am debating whether to remove the body from the frame.It looks fairly simple.It looks as if there are 10 or so bolts that hold the frame to the body.Are there any traps that i might encounter taking the body off.It is a 2 door hardtop.If i keep track of the shims and pads between the body and frame will I have a problem when I put the body to the frame.
    Got a quote of 1000$ to blast all parts and the frame and body.Is this a decent price.Also concerned about the surface after blasting.The guy tht runs the shop says use a good 2part epoxy primer ,The surface will be as smooth as a babys butt.Any info will be appreciated Thanks.

  • #2
    The frame can be blasted with anything, but the body needs special care; like plastic media or soda maybe baking soda or glass bead. Not sand. Gets hot. That sounds like a really fair price. Does he do powdercoating? It's great for frames, and all the suspension.

    Comment


    • #3
      If you removed all the parts you said you shouldn't have a problem with the body coming off. I paid a guy $550 to media (Plastic) just the body so $1000 doesn't sound too bad. Mine is 1955 Commander coupe. Good luck

      Comment


      • #4
        I'd recommend plastic media. Soda can cause problems if the car is not cleaned properly after blasting.
        Wayne
        "Trying to shed my CASO ways"

        sigpic​

        Comment


        • #5
          Since it is a hardtop, I'd recommend bracing the door openings before lifting the body.

          Then purchase one of those over head electric hoists (Harbor Freight sells them for around $59) and get a few heavy duty towing straps. Place one of the towing straps under the front body to frame supports and run the other under the rear wheel wells.

          This makes removing the body very easy with one set of hands (all you have to do is push a switch) and even easier work of lowering the body back onto the frame when you're done.

          I lifted my body using multiple floor jacks and wood beams, then used the hoist method for lowering the body. Just wish I had thought about the hoist during disassembly [xx(]

          Comment


          • #6
            quote:Originally posted by wcarroll

            Since it is a hardtop, I'd recommend bracing the door openings before lifting the body
            Will is right on, I did that when I lifted the 54K body. In fact, if the floors are really bad also brace the door posts to keep the proper orientation. If those are not correct the doors will not fit correctly.

            I am not, however, in favor of the single point lift. People generally lift by the top and that can cause two issues. Any rust in the gutter area can cause distortion of the roof and, secondly, it's tough to get a good balance point.

            I lifted mine by bolts through the main body mounts in the trunk with a plank underneath to spread the load. I used my engine hoist to lift the rear.

            In front I bridged between the hood hinge mounts for stability and raised the front with a 3 ton chainfall. I think you could connect to the same points for a single lift if you decided to go that way.

            My body was really rusty in the floors, rockers, firewall and jambs. It stayed stable until it was mounted on the rotisserie and repaired.

            Bob


            ,

            Comment


            • #7
              I didn't see that you had removed the windshield or rear window. You may crack the glass by lifting the body. It has happened, just ask me!

              Don

              Comment


              • #8
                Pay special attention to what Bob mentioned about lifting by the top -it's a big No No -especially if you ever want the doors and glass to fit properly again.

                Also, be sure to bag, tag, and diagram the locations of the numerous rubber body-to-frame spacers and stacks of radiator/front fender washers. You'll be thanking yourself when you put things back together a few decades from now...J/K


                Comment


                • #9
                  A few decades from now???

                  Are you accusing him of being as slow as me???

                  Dean.

                  Comment


                  • #10
                    Voice of experience:
                    I have blasted at least 20 Studebakers myself. I now have a local guy do them for me.. but at my direction- he knows how I want them blasted. There are several members here that can verify this, and I can show hundreds of pictures of the results.(since 1983)

                    #1: I do not know what the /hr charge is in your area, but around here it's $125. At that rate, a GOOD-Experienced blaster takes about 6-hours ($750) to do a complete disassembled Studebaker. Shell (inside-out-both sides) Frame (inc rear axle), Hood, Doors (2), trunk lid, Quarters (removed), gas lid, ventilators, radiator shroud, radiator support, front grille brace, bumper brackets, and a few other miscellaneous parts I'm probably forgetting.
                    #2: You can sandblast every panel on your Stude with a few caveats:
                    A) Unless there is significant floor/trunk damage- you do NOT need to brace the door openings.... Even on a hardtop. It's not a bad idea to brace them... just not really needed. (Brace convertibles!)The pic below shows a hardtop with SIGNIFICANT floor issues! It was not braced.


                    B) The roof, trunklid, and hood can be blasted 6"-10" around the outside edges on BOTH sides- BUT... the blaster MUST back off and blast the center of the outer skins... from a distance- and keeping the blast-pattern moving (fast)... +++ FROM ONE SIDE ONLY!!! Let me say that again- 6"-10" around the edges (there is structure there to prevent warpage).... but the large flat expanses must be blasted from ONE SIDE ONLY!!!!! (don't make me repeat that again... just take it as gospel) The undersides (that you can't see) can be hand-stripped with an 80grit sander and/or wire cup on a grinder later. (like THIS)


                    #3: Yes, remove the body shell from the frame...
                    #4: The rear axle will need disassembly and cleaning after blasting. Especially the axles and axle bearings, and pinion bearing. Make sure the blaster does NOT blast it from too close- around the axles, or pinion, or VENT-HOLE on the driver's side axle-tube (cover the hole w/2-layers of duct tape). Do NOT remove the bolt that holds the brake-hose junction to the rear axle.
                    #5: Remember to double-layer duct-tape the serial# plate on the driver's hinge-pillar!!!!!!!!
                    #6: Remove ALL Glass- do NOT just roll the windows down into the doors.
                    #7: YES, 2-part epoxy is the best 1st coating. I use PPG epoxy (their DP-series), Choose the closest color to your finish-color. IE: DP-40 (green) DP-48 (white) DP-90 (black) DP-74 (Red oxide), etc...
                    #8: There is some pre-blasting prep you need to do- Remove all grease and caked-on dirt from the front suspension and frame. Remove any LOOSE undercoating (remove it all if you don't want any undercoating), Sandblasting does NOT remove undercoating or heavy-grease very easily. It will really run the hours up if you tell the blaster to remove it.
                    #9: FORGET keeping track of the shims and rubber pads- replacing them as-original will NOT guarantee body-alignment. Just chart their location (also in the parts-book). Every mounting point MUST have at least (1) RUBBER pad... and the rest made up of metal shims as-needed. (Some day I will write a dissertation on this)

                    There are probably several other things that escape me right now (tired).. but these are all equally important for a good job.

                    Ray


                    Specializing in Studebaker Restoration
                    Ray

                    www.raylinrestoration.com
                    Specializing in Studebaker Restoration

                    Comment


                    • #11
                      And cover your Serial number plate.

                      You don't want the blaster forgetting

                      ChopStu

                      128 weeks till completion.
                      61 Lark

                      sigpic

                      Comment


                      • #12
                        Thanks for all the good info,Pretty much as I thought

                        Comment


                        • #13
                          Great stuff, Ray. What's your opinion on dipping as opposed to blasting?

                          Robert (Bob) Andrews- on the IoMT (Island of Misfit Toys)
                          Parish, central NY 13131

                          GOD BLESS AMERICA


                          Comment

                          Working...
                          X