Announcement

Collapse
No announcement yet.

Champ Update

Collapse
X
 
  • Filter
  • Time
  • Show
Clear All
new posts

  • Champ Update

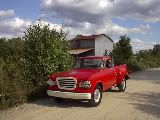
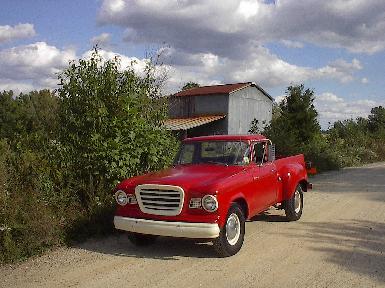
    Haven't posted one of these in a while, between life being busy, weather and the fact that little bits of welding just aren't that interesting I haven't updated my blog recently.

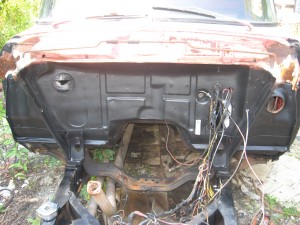
    But- the floor is done, the firewall is cleaned and painted (well, sprayed with bedliner), the new cab mounts are fabricated and installed and I even properly repaired the cracked motor mount bracket.


    Jeff DeWitt

    Jeff DeWitt
    http://carolinastudes.net

  • #2
    Jeff - Was the "bedliner" you sprayed on the firewall a commercial product (done at a shop)? or was it something bought in a can? or something else? Thanks.

    <h5>Mark
    '57 Transtar Deluxe
    Vancouver Island Chapter
    http://sdcvi.shawwebspace.ca/ </h5>


    Mark Hayden
    '66 Commander

    Comment


    • #3
      Mark,

      It was regular old rattle can Dupli-Color bedliner. I'm planning on painting the engine silver with body colored (red) valve covers and air cleaner and after seeing how that bedliner looked on the inner fenders I decided to spray the engine bay with it. That black ought to make the silver and red engine really pop, plus of course it's easier to make it look good!

      Jeff DeWitt

      Jeff DeWitt
      http://carolinastudes.net

      Comment


      • #4
        Jeff,

        What did you use to make those front cab mounts? angle iron?, plate? and what are the rough dimensions of the parts?

        Also, what is the spacing between the frame and the bottom of the bracket.

        I'm slowly working on my ugly Champ project and the cab can use as much support as it can get

        Jeff T.

        "I'm getting nowhere as fast as I can"
        The Replacements.
        \"I\'m getting nowhere as fast as I can\"
        The Replacements.

        Comment


        • #5
          quote:Originally posted by JeffDeWitt

          Mark,

          It was regular old rattle can Dupli-Color bedliner. I'm planning on painting the engine silver with body colored (red) valve covers and air cleaner and after seeing how that bedliner looked on the inner fenders I decided to spray the engine bay with it. That black ought to make the silver and red engine really pop, plus of course it's easier to make it look good!

          Jeff DeWitt
          Just the info I was looking for - Thx!

          <h5>Mark
          '57 Transtar Deluxe
          Vancouver Island Chapter
          http://sdcvi.shawwebspace.ca/ </h5>


          Mark Hayden
          '66 Commander

          Comment


          • #6
            I had not been to your site for a while. Thanks for going to the trouble or recording your experience. It is helpful and encouraging to the rest of us.


            1952 Champion Starlight, 1962 Daytona, both w/overdrive.Searcy,Arkansas
            "I may be lazy, but I'm not shiftless."
            "In the heart of Arkansas."
            Searcy, Arkansas
            1952 Commander 2 door. Really fine 259.
            1952 2R pickup

            Comment


            • #7
              Thanks for the comments.

              One of the reasons I created that blog was to document my experience, both for other people to see and as an encouragement to myself. Poking away at the truck a few hours (at best) a week it's hard to see much progress, but looking at the blog reminds me of how far it's come.

              About the brackets, they were made from flat steel I got at Lowes, I'm afraid my method wasn't very scientific. I cut a piece to what seemed like the right length, drilled a hole to match an existing hole in the frame, bolted it in place, and then used a straight edge to mark the ends so I could cut them parallel with both the bottom of the frame and the brace on the existing cab mount. Once that was cut I used it as a template to cut the other three pieces.

              It took a bit of doing, and of course some pieces were mirror images. The inboard piece on the drivers side was the trickiest part as it had to be cut to clear the steering box.

              Once the side pieces were cut they were bolted somewhat snugly in place in place and cut the top pieces to fit and tack welded them in place. Then I removed them, finished the welding, put them back in place to drill the second hole and the holes in the top. After that they were removed one last time, the welds ground somewhat smooth and the brackets painted.

              They are about high enough above the frame for the heads of the bolts to fit, I put the bolts in place before finally installing the brackets, there is just one piece of rubber padding in between the bracket and the mount, made from a piece of sidewall. (Isn't that just what Studebaker did? &lt;G&gt The front of the factory body mount is just over an inch above the level of the frame.

              I'll get some measurements and some more detailed pictures and post them later.

              Jeff DeWitt

              Jeff DeWitt
              http://carolinastudes.net

              Comment

              Working...
              X