Announcement

Collapse
No announcement yet.

Dash Installation

Collapse
X
 
  • Filter
  • Time
  • Show
Clear All
new posts

  • Dash Installation

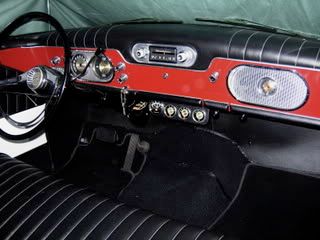
    Hey guys, I know that it's been awhile since i've been here, but I need help. I have a n.o.s. dash all painted and ready to install in my '64 cruiser. Any suggestions on what kind of glue to use? I don't know what kind of foam was used behind the vinyl so it made for a confusing time at the auto parts store.
    Also, any ideas on how to remove the wide chrome strip that's attached across the front of the dash?
    Thanks for your help.

  • #2
    the "chrome" strip is actually soft aluminum (so you have to be careful). There are tabs on the back side that are folded over - carefully straighten them and the strip should come off rather easily.

    --george

    1963 Lark Daytona HT - 63V J8 175
    1963 Lark Daytona HT - 63V J8 175

    Comment


    • #3
      Pckstude,

      I am about to undertake the same job and was going to post similar questions. I haven't glued my NOS green 64 Lark dash pad on the metal frame yet and was also wondering what glue to use.

      I haven't dyed my pad yet because I plan to do that after it is glued in place.

      After it's glued, what are the steps to prepare the surface for the vinyl dye. Is there a cleaner of some kind? I bought a spray can of red dye from SI at Lancaster so I have that.

      Also, I heard that the vinyl dye has a very flat appearance. It was suggested that I spray a coat of clear semi-gloss over the red to give it a slight shine.

      Any thoughts/tips are appreciated.

      Comment


      • #4
        Studefan,,, I highly suggest u paint the dash before installing it because u won't be able to spray certain areas with it installed. U can get a can of vinyl cleaner at ur body paint supply store, or auto store. It works good. I think that i will use it to clean off the areas of metal that the dash was glued to.
        What I had to do to get the dash off:
        I used a 1/4 drive ratchet with a screwdriver tip that fits into a 5/16 socket, and secure the tip with some elec. tape. A regular screwdriver didn't work for me because i couldn't get enough torque on the screw.
        Also, remove the radio, because u need to take the speaker screen off.
        Remove the glove box, it provides easier access to the 3 screws that hold that end of the dash on.
        The three screws on the drivers side are easier to reach by taking the screws out of the fuse pad. Also i took two of the three screws out of the end plate so it could swing forward and provide some light to see with.
        Once the dash is off the two aluminum trim pieces from each end come off with a nut. The aluminum trim piece across the radio comes off when u remove the radio.
        The piece of trim on the glove compartment door is still a mystery to me. There are 4 thin slots on the top of the piece so i'm assuming that has something to do with its attachment.
        And thanks about the comment concerning the paint looking flat. The advise u got about putting a clear coat on it, to shine it up a bit after painting, sounds like a good idea because mine did come out looking flat.
        The paint came out much lighter than i had anticipated. When i purchased the paint i took a n.o.s. rear door panel to the paint store, and thought I had made a good match. But now it looks like i need a darker red.
        I have also noticed that there seems to be a bit of metal flake appearance on the original dash. I've seen this before in other stude vinyl interiors.
        This is what's happened to me with the project. I'm more than willing to any suggestions, or info someone wants to share.
        Thanks, Pckstude

        Comment


        • #5
          quote:Originally posted by Pckstude
          The piece of trim on the glove compartment door is still a mystery to me. There are 4 thin slots on the top of the piece so i'm assuming that has something to do with its attachment.
          The tabs (as I described above) are INSIDE the vanity - gently lift up the felt that lines the compartments. The tabs for the aluminum strip are under there. Again, gently straighten them and the panel will come off the front.

          --george

          1963 Lark Daytona HT - 63V J8 175
          1963 Lark Daytona HT - 63V J8 175

          Comment


          • #6
            Dash update: The color, paint/dye that i had originally purchased for the dash did not come out good. So today i bought a much darker color than i thought was needed, and it came out perfect. Also, instead of going thru the hassle of replace the glove compartment door skin, I just cleaned it up, taped over the alum. strip, and painted it with the new paint too. It's gonna look so nice when it's done.

            Comment


            • #7
              I am nowhere near the interior expert that many are here, but I have had some experience with the vinyl dye and have asked restorers on what the best prep would be. At their advice, I have used 99% alcohol to clean the surface of all my vinyl, let it dry and sprayed two or three thin coats. Napa sells a paint prep for adhesive and grease removaI that may also work, but that is usually for metal parts; not sure what it would do to vinyl and if it would leave a residue. I used black, so didn't need to mix and match anything at the store. Napa sells a shiny black vinyl dye and a flat version. Not sure if they can mix it in the same manner for custom colors. Nothing I have done has ever flaked off, fisheyed, faded, or rubbed off so far in twelve years. If changing color from the original part, such as an armrest, I paint in the sunlight, then move it to a dust and flying bug free environment. No matter how great the lighting, a warm temp sunlight shows everything the best for me...and always off the dash if dyeing those. Others may disagree, though and offer better methods. The dash knee pads were dyed here:

              [img][/img]


              Comment


              • #8
                Barnlark,,, I'm no expert either. Just trying to relate what I've done, and what was told to me. The dash will begin it's installation today. Wish me luck. Taking things apart is usually easier than putting them back together. Looks like u did a good job. I like the red/black color scheme too. Thanks for the info u passed on.

                Comment


                • #9
                  Update on the dash installation. The dash has been glued in. Now i'm wrestling with the glove box door. The original fit of the door to the dash was not perfect, and that imperfection is now worse. Meaning the door is too far to the right. I have tried loosening what screws i could, including the screws on both sides of the hinge, and the right end of the dash itself, but it still hangs up on the upper right corner.
                  Now i'm seriously considering elongating some holes to give me more movement to the left.
                  And like working on anything else that's old, be prepared to replace items that u had not thought of. An example of this is the glove box. It's of cardboard construction and has turned brittle after 45 years. Go figure. Another replacement item is the speaker for the radio. I will not be able to find a direct replacement, so I will have to rig up something for the new speaker.
                  Original fit and finish was not all that great to begin with. It's amazing what details one is exposed to when doing a job like this.
                  For a detailed list of observations, and suggestions for replacing a 1964 dash, and possibly for '63 dashes too, as i think they are close in design, drop me an email and I will send u the list to you.
                  Thanks for letting me share, f.b.
                  I am by no meanings an expert. It is my need to share with others what experiences that I've come across. Perhaps if i had asked, or looked more for idea's and suggestions from others, it could've made the project easier. But I was in a hurry to get it done, and went on the voyage of discovery on my own.

                  Comment

                  Working...
                  X